xyk blog

最近は iOS 開発の記事が多めです。

SwiftでAVAudioPlayerを使ってサウンドファイルを再生する

環境: Swift3

前回はAudioServicesPlaySystemSoundでサウンドファイルを再生したが、今回はAVAudioPlayerを使って再生する例。
AVAudioPlayerインスタンスは強参照する。

import AVFoundation

var audioPlayer: AVAudioPlayer?

func playSound() {
    do {
        self.audioPlayer?.stop()
        self.audioPlayer = try AVAudioPlayer(contentsOf: Bundle.main.url(forResource: "pico", withExtension: "mp3")!)
        self.audioPlayer?.volume = 0.7
        self.audioPlayer?.numberOfLoops = 0 // 1回再生。-1で無限ループ
        self.audioPlayer?.prepareToPlay()
        self.audioPlayer?.play()
    } catch {
        print(error)
    }
}

Swiftで短いサウンドファイルを再生する

環境: Swift3

今回はpico.mp3という効果音ファイルがあり、それを再生する例。
まずは、このファイルをXcodeのプロジェクトに右クリックのAdd Files to **から追加する。
TARGETのBuild Phases->Copy Bundle Resourcesに追加したファイルが含まれていることを確認する。
そして以下コードを実行する。

import AudioToolbox

func playSound() {
    let url = Bundle.main.url(forResource: "pico", withExtension: "mp3")!
    var soundID: SystemSoundID = 0
    AudioServicesCreateSystemSoundID(url as CFURL, &soundID)
    AudioServicesPlaySystemSound(soundID)
}

これで再生することはできた。
が、調べていくとサウンドリソースの解放処理も入れたほうがよいらしい。
そこでPlayの後にDisposeを入れてみると、サウンドが再生されなくなった。

func playSound() {
    let url = Bundle.main.url(forResource: "pico", withExtension: "mp3")!
    var soundID: SystemSoundID = 0
    AudioServicesCreateSystemSoundID(url as CFURL, &soundID)
    AudioServicesPlaySystemSound(soundID)
    AudioServicesDisposeSystemSoundID(soundID) // サウンドが再生されなくなった
}

サウンド再生完了後に処理を実行できるAudioServicesAddSystemSoundCompletionというコールバック関数(クロージャの第1引数にsoundIDが入ってくる)があったので、そこでDisposeするように修正した。

func playSound() {
    let url = Bundle.main.url(forResource: "pico", withExtension: "mp3")!
    var soundID: SystemSoundID = 0
    AudioServicesCreateSystemSoundID(url as CFURL, &soundID)
    AudioServicesAddSystemSoundCompletion(soundID, nil, nil, { (soundID, _) in
        AudioServicesDisposeSystemSoundID(soundID)
    }, nil)
    AudioServicesPlaySystemSound(soundID)
}

これでOK

AudioServicesPlaySystemSoundで再生したサウンドの音量が変更できない問題

AudioServicesPlaySystemSoundで再生したサウンドの音量が固定でiPhoneの音量設定に合わせて変更できないことに気づいた。
一応、iPhoneの設定-> サウンドと触覚 -> ボタンで変更 をONにすることでiPhoneの音量設定に合わせて変更できるようになる。

f:id:xyk:20170221103719p:plain f:id:xyk:20170221103721p:plain

ここがOFFだとアプリ側では制御できないので、音量を制御したい場合はAVAudioPlayerを使ったほうがよいかもしれない。

UICollectionViewで縦横両方向にスクロールさせる

環境: Swift3

f:id:xyk:20170209184815g:plain

コレクションビューで縦横どちらにもスクロールさせることはできるか調べてみた。
デフォルトのレイアウトクラスであるUICollectionViewLayoutでは縦横どちらかの方向にしかスクロールできないようだ。

コレクションビューではUICollectionViewLayoutを継承したクラスでレイアウトを管理する。
縦横にセルを並べたフローレイアウト用のUICollectionViewFlowLayoutが標準で用意されている。
StoryBoard上でUICollectionViewを貼り付けた場合、これがデフォルトで使用されるようになっている。
これを使った場合は基本的に縦横どちらかの方向にしかスクロールできない。
f:id:xyk:20170209180511p:plain

まず、UICollectionViewFlowLayoutを継承したカスタムクラスBidirectionalCollectionLayoutを用意する。
やっていることは、最初にすべてのセルを含んだ縦幅、横幅の計算とUICollectionViewLayoutAttributes(レイアウト属性を管理するオブジェクト)の作成をしてキャッシュする。
func layoutAttributesForElements(in rect: CGRect)ではrect 内のすべてのセルのレイアウト属性を返す、
func layoutAttributesForItem(at indexPath: IndexPath)では indexPath で示されるアイテムのレイアウト属性を返す。

import UIKit

final class BidirectionalCollectionLayout: UICollectionViewFlowLayout {
    
    weak var delegate: UICollectionViewDelegateFlowLayout?
    
    private var layoutInfo: [IndexPath : UICollectionViewLayoutAttributes] = [:]
    private var maxRowsWidth: CGFloat = 0
    private var maxColumnHeight: CGFloat = 0
    
    private func calcMaxRowsWidth() {
        
        guard
            let collectionView = self.collectionView,
            let delegate = self.delegate
        else { return }
        
        var maxRowWidth: CGFloat = 0
        for section in 0..<collectionView.numberOfSections {
            var maxWidth: CGFloat = 0
            for item in 0..<collectionView.numberOfItems(inSection: section) {
                let indexPath = IndexPath(item: item, section: section)
                let itemSize = delegate.collectionView!(collectionView, layout: self, sizeForItemAt: indexPath)
                maxWidth += itemSize.width
            }
            maxRowWidth = maxWidth > maxRowWidth ? maxWidth : maxRowWidth
        }
        
        self.maxRowsWidth = maxRowWidth
    }
    
    private func calcMaxColumnHeight() {
        
        guard
            let collectionView = self.collectionView,
            let delegate = self.delegate
        else { return }
        
        var maxHeight: CGFloat = 0
        for section in 0..<collectionView.numberOfSections {
            var maxRowHeight: CGFloat = 0
            for item in 0..<collectionView.numberOfItems(inSection: section) {
                let indexPath = IndexPath(item: item, section: section)
                let itemSize = delegate.collectionView!(collectionView, layout: self, sizeForItemAt: indexPath)
                maxRowHeight = itemSize.height > maxRowHeight ? itemSize.height : maxRowHeight
            }
            maxHeight += maxRowHeight
        }
        
        self.maxColumnHeight = maxHeight
    }
    
    private func calcCellLayoutInfo() {
        
        guard
            let collectionView = self.collectionView,
            let delegate = self.delegate
        else { return }
        
        var cellLayoutInfo: [IndexPath : UICollectionViewLayoutAttributes] = [:]
        
        var originY: CGFloat = 0
        
        for section in 0..<collectionView.numberOfSections {
            
            var height: CGFloat = 0
            var originX: CGFloat = 0
            
            for item in 0..<collectionView.numberOfItems(inSection: section) {
                let indexPath = IndexPath(item: item, section: section)
                let itemAttributes = UICollectionViewLayoutAttributes(forCellWith: indexPath)
                
                let itemSize = delegate.collectionView!(collectionView, layout: self, sizeForItemAt: indexPath)
                itemAttributes.frame = CGRect(x: originX, y: originY, width: itemSize.width, height: itemSize.height)
                cellLayoutInfo[indexPath] = itemAttributes
                
                originX += itemSize.width
                height = height > itemSize.height ? height : itemSize.height
            }
            originY += height
        }
        
        self.layoutInfo = cellLayoutInfo
    }
    
    override func prepare() {
        
        self.delegate = self.collectionView?.delegate as? UICollectionViewDelegateFlowLayout
        
        self.calcMaxRowsWidth()
        self.calcMaxColumnHeight()
        self.calcCellLayoutInfo()
    }
    
    override func layoutAttributesForElements(in rect: CGRect) -> [UICollectionViewLayoutAttributes]? {
        
        var allAttributes: [UICollectionViewLayoutAttributes] = []
        for attributes in self.layoutInfo.values {
            
            if rect.intersects(attributes.frame) {
                allAttributes.append(attributes)
            }
        }
        
        return allAttributes
    }
    
    override func layoutAttributesForItem(at indexPath: IndexPath) -> UICollectionViewLayoutAttributes? {
        
        return self.layoutInfo[indexPath]
    }
    
    override var collectionViewContentSize: CGSize {
        
        return CGSize(width: self.maxRowsWidth, height: self.maxColumnHeight)
    }

}

続いてViewControllerの実装。
横方向のセル数はnumberOfItemsInSectionで、縦方向のセル数はnumberOfSectionsで定義する。
今回は10x10用意した。

import UIKit

class ViewController: UIViewController {
    
    @IBOutlet weak var collectionView: UICollectionView!
    
    override func viewDidLoad() {
        super.viewDidLoad()
    }
    
}

extension ViewController: UICollectionViewDataSource {
    
    func collectionView(_ collectionView: UICollectionView, numberOfItemsInSection section: Int) -> Int {
        
        return 10
    }
    
    func numberOfSections(in collectionView: UICollectionView) -> Int {
        
        return 10
    }
    
    func collectionView(_ collectionView: UICollectionView, cellForItemAt indexPath: IndexPath) -> UICollectionViewCell {
        
        let cell = collectionView.dequeueReusableCell(withReuseIdentifier: "Cell", for: indexPath) as! CollectionViewCell
        let position = "\(indexPath.section) - \(indexPath.row)"
        cell.titleLabel.text = position
        
        if indexPath.section % 2 == 0 {
            if indexPath.row % 2 == 0 {
                cell.backgroundColor = UIColor(hex: 0xff6e86)
            } else {
                cell.backgroundColor = .white
            }
        } else {
            if indexPath.row % 2 == 0 {
                cell.backgroundColor = .white
            } else {
                cell.backgroundColor = UIColor(hex: 0xff6e86)
            }
        }

        return cell
    }
}

extension ViewController: UICollectionViewDelegate {
    
    func collectionView(_ collectionView: UICollectionView, didSelectItemAt indexPath: IndexPath) {
        
        let position = "\(indexPath.section) - \(indexPath.row)"
        print("didSelect:", position)
    }
}

extension ViewController: UICollectionViewDelegateFlowLayout {
    
    func collectionView(_ collectionView: UICollectionView, layout collectionViewLayout: UICollectionViewLayout, sizeForItemAt indexPath: IndexPath) -> CGSize {
        
        return CGSize(width: 200, height: 200)
    }
    
}

StoryBoardから作成したレイアウトクラスを設定する。

f:id:xyk:20170209182000p:plain

Font Awesome を Xcode で使用する

環境: swift3

fontawesome.io

FontAwesome をXcodeにカスタムフォントとして取り込んで使用する方法。

以下からFontAwesome.otfをダウンロードする

https://github.com/FortAwesome/Font-Awesome/blob/master/fonts/FontAwesome.otf

Xcode のプロジェクト内にコピーして取り込む

この時、Build PhasesCopy Bundle Resourcesに追加されているか確認する。
追加されてなければ追加する。

Info.plist にキーUIAppFontsFontAwesome.otfを追加する

f:id:xyk:20170208161417p:plain

ソースコードを直接見ると以下のようになっている。

<key>UIAppFonts</key>
<array>
    <string>FontAwesome.otf</string>
</array>

追加したフォントをコードから利用する

http://fontawesome.io/cheatsheet/
こちらを参考にUnicodeで指定する。

let attr = [
    NSForegroundColorAttributeName: UIColor.gray,
    NSFontAttributeName: UIFont(name: "FontAwesome", size: 20)!,
]
self.textLabel?.attributedText = NSAttributedString(string: "\u{f013}", attributes: attr)

mitmproxyメモ

インストール

homebrewからインストールすると古いバージョンがインストールされたので

https://github.com/mitmproxy/mitmproxy/releases

こちらから最新のバージョンv1.0.2のバイナリmitmproxy-1.0.2-osx.tar.gzをダウンロードした。
以下、実機端末で確認するための手順。


設定手順

MaciPhoneをケーブルで接続
MacIPアドレスを調べる
iPhoneWifi設定のHTTPプロキシ設定を「手動」にして上で調べたIPアドレスとポート番号8080を設定する

f:id:xyk:20170207115427p:plain

mitmproxyを起動する
$ ./mitmproxy -p 8080

-

iPhoneのブラウザから http://mitm.it にアクセスして証明書をiPhoneにインストールする

f:id:xyk:20170207115646p:plain

※ このとき以前インストールした証明書が期限切れになっていた。
しばらく期限切れになっているのに気付かずHTTPSの通信ができなくてハマった。
昔にmitmproxyをインストールしたことがあって、その時の古い証明書がMac側に残っていたのが原因だった。
$HOME/mitmproxy/以下に証明書があるので、いったんこのディレクトリを削除して、再度mitmproxyを起動すると新しい証明書が作成された。
ちなみに前は、mitmproxy-ca-cert.pemをメールに添付してiPhoneに送り、それをクリックしてインストールしていた。
手動でやる手順
http://docs.mitmproxy.org/en/stable/certinstall.html

証明書信頼設定をONにする

設定 -> 一般 -> 情報 -> 証明書信頼設定 -> mitmproxy をONにする

f:id:xyk:20190417172125j:plain

ここまでやればOKなはず。

SSL通信ができない場合は、
iPhoneからmitmproxyのプロファイル削除
mac~/mitmproxyディレクトリ削除
を行ってからこの手順を最初から行ってみる。

別のMacでも同一iPhoneに対して mitmproxy を使用する場合は、最初のMacで作成した証明書が必要なので~/mitmproxyディレクトリ毎コピーして持ってくる。
~/mitmproxyディレクトリは mitmproxy 起動時に作成されるので既に作成済みなら先に削除しておく。


キーボードショートカット

以前のバージョンと変わっていた。

http://docs.mitmproxy.org/en/stable/mitmproxy.html

?を押すと一覧が確認できる。

This view:

      A      accept all intercepted flows
      a      accept this intercepted flow
      b      save request/response body
      C      export flow to clipboard
      d      delete flow
      D      duplicate flow
      e      toggle eventlog
      E      export flow to file
      f      filter view
      F      toggle follow flow list
      L      load saved flows
      m      toggle flow mark
      M      toggle marked flow view
      n      create a new request
      o      set flow order
      r      replay request
      S      server replay request/s
      U      unmark all marked flows
      v      reverse flow order
      V      revert changes to request
      w      save flows
      W      stream flows to file
      X      kill and delete flow, even if it's mid-intercept
      z      clear flow list or eventlog
      tab    tab between eventlog and flow list
      enter  view flow
      |      run script on this flow


Movement:

      j, k           down, up
      h, l           left, right (in some contexts)
      g, G           go to beginning, end
      space          page down
      pg up/down     page up/down
      ctrl+b/ctrl+f  page up/down
      arrows         up, down, left, right


Global keys:

      i  set interception pattern
      O  options
      q  quit / return to previous page
      Q  quit without confirm prompt
      R  replay of requests/responses from file


Filter expressions:

      ~a          Match asset in response: CSS, Javascript, Flash, images.
      ~b regex    Body
      ~bq regex   Request body
      ~bs regex   Response body
      ~c int      HTTP response code
      ~d regex    Domain
      ~dst regex  Match destination address
      ~e          Match error
      ~h regex    Header
      ~hq regex   Request header
      ~hs regex   Response header
      ~http       Match HTTP flows
      ~m regex    Method
      ~marked     Match marked flows
      ~q          Match request with no response
      ~s          Match response
      ~src regex  Match source address
      ~t regex    Content-type header
      ~tcp        Match TCP flows
      ~tq regex   Request Content-Type header
      ~ts regex   Response Content-Type header
      ~u regex    URL
      !           unary not
      &           and
      |           or
      (...)       grouping

    Regexes are Python-style.
    Regexes can be specified as quoted strings.
    Header matching (~h, ~hq, ~hs) is against a string of the form "name: value".
    Expressions with no operators are regex matches against URL.
    Default binary operator is &.

    Examples:

      google\.com             Url containing "google.com
      ~q ~b test              Requests where body contains "test"
      !(~q & ~t "text/html")  Anything but requests with a text/html content type.

よく使うやつ。

  • 全クリア
    z

  • followingモード
    F

  • フィルタ
    f

  • インタセプト
    i

  • コピー
    Altを押したまま選択

SwiftでON・OFFの切り替えをする円形ボタンを作る

環境: Swift3

f:id:xyk:20170123143938g:plain

こんな感じの円形ボタンのカスタムビューを作る。
ボタンというよりUISwitch的なON・OFFの状態切り替えをさせたい。
UIControlを継承して、状態はisSelectedプロパティで保持している。

import UIKit
import PlaygroundSupport

final class CircleView: UIControl {

    var didTouchUpInsideHandler: (() -> Void)?
    
    let normalColor = UIColor(hex: 0x59acff)
    let selectedColor = UIColor(hex: 0xFF6E86)

    var circleColor: UIColor {
        return self.isSelected ? self.selectedColor : self.normalColor
    }

    // タッチの反応を円内のみとする
    override func point(inside point: CGPoint, with event: UIEvent?) -> Bool {
        return self.circleShapeLayer.path?.contains(point) ?? false
    }

    // タッチ時、離れた時に呼ばれる
    override var isHighlighted: Bool {
        didSet {
            guard oldValue != self.isHighlighted else { return }
            
            self.circleShapeLayer.fillColor = self.isHighlighted ?
                self.circleColor.darkColor().cgColor : self.circleColor.cgColor

            if self.isHighlighted {
                UIView.animate(
                    withDuration: 0.05,
                    delay: 0,
                    options: [.allowUserInteraction, .beginFromCurrentState],
                    animations: { [weak self] in
                        self?.transform = CGAffineTransform(scaleX: 1.1, y: 1.1)
                })
            } else {
                UIView.animate(
                    withDuration: 1,
                    delay: 0,
                    usingSpringWithDamping: 0.15,
                    initialSpringVelocity: 10,
                    options: [.allowUserInteraction, .beginFromCurrentState],
                    animations: { [weak self] in
                        self?.transform = CGAffineTransform.identity
                })
            }
        }
    }
    
    // 円の描画
    override func layoutSublayers(of layer: CALayer) {
        super.layoutSublayers(of: layer)
        
        if self.circleShapeLayer.superlayer == nil {
            self.layer.insertSublayer(self.circleShapeLayer, at: 0)
        }
    }
    
    // 円のlayer作成
    lazy var circleShapeLayer: CAShapeLayer = { [unowned self] in
        
        let path = UIBezierPath(ovalIn: self.bounds)
        
        let shapeLayer = CAShapeLayer()
        shapeLayer.fillColor = self.circleColor.cgColor
        shapeLayer.path = path.cgPath
        
        return shapeLayer
    }()

    // タッチを離した時
    override func endTracking(_ touch: UITouch?, with event: UIEvent?) {
        super.endTracking(touch, with: event)
        
        // 円内で離した場合のみに反応させる
        if let point = touch?.location(in: self),
            let path = self.circleShapeLayer.path,
            path.contains(point) {
            
            self.isSelected = !self.isSelected
            self.didTouchUpInsideHandler?()
        }
    }
}

extension UIColor {
    
    convenience init(hex: UInt32, alpha: CGFloat = 1.0) {
        let mask = 0x000000FF
        
        let r = Int(hex >> 16) & mask
        let g = Int(hex >> 8) & mask
        let b = Int(hex) & mask
        
        let red   = CGFloat(r) / 255
        let green = CGFloat(g) / 255
        let blue  = CGFloat(b) / 255
        
        self.init(red:red, green:green, blue:blue, alpha: alpha)
    }
    
    // 暗めの色にする
    func darkColor(brightnessRatio: CGFloat = 0.8) -> UIColor {
        
        var hue: CGFloat = 0
        var saturation: CGFloat = 0
        var brightness: CGFloat = 0
        var alpha: CGFloat = 0
        
        if self.getHue(&hue, saturation: &saturation, brightness: &brightness, alpha: &alpha) {
            return UIColor(hue: hue, saturation: saturation, brightness: brightness * brightnessRatio, alpha: alpha)
        } else {
            return self
        }
    }
}

let baseView = UIView(frame: CGRect(x: 0, y: 0, width: 200, height: 200))
baseView.backgroundColor = .white

let view = CircleView(frame: CGRect(x: 0, y: 0, width: 100, height: 100))
view.center = baseView.center
baseView.addSubview(view)

PlaygroundPage.current.liveView = baseView

Storyboardを使ってUITableViewを組み立てる場合のテンプレート(Swift3)

環境: Swift3

よく使うのでコピペ用にメモしておく。

ViewController

import UIKit

class ViewController: UIViewController {

    var items: [String] = ["foo", "bar", "hoge"]
    
    @IBOutlet weak var tableView: UITableView?
    
    override func viewDidLoad() {
        super.viewDidLoad()
    }
}

extension ViewController: UITableViewDataSource, UITableViewDelegate {
    
    func tableView(_ tableView: UITableView, numberOfRowsInSection section: Int) -> Int {
        return self.items.count
    }
    
    func tableView(_ tableView: UITableView, cellForRowAt indexPath: IndexPath) -> UITableViewCell {
        let cell = tableView.dequeueReusableCell(withIdentifier: "MyCell", for: indexPath) as! MyCell
        cell.item = self.items[indexPath.row]
        return cell
    }
    
    func tableView(_ tableView: UITableView, heightForRowAt indexPath: IndexPath) -> CGFloat {
        return 60
    }
    
    func tableView(_ tableView: UITableView, didSelectRowAt indexPath: IndexPath) {
        tableView.deselectRow(at: indexPath, animated: true)
    }
    
}

final class MyCell: UITableViewCell {
    
    var item: String? {
        didSet {
            self.nameLabel?.text = self.item
        }
    }

    override func awakeFromNib() {
        super.awakeFromNib()
    }

    @IBOutlet weak var nameLabel: UILabel?
}

カスタムセルMyCellを定義する。
Storyboard 上でカスタムセルを貼り付けて定義している場合は以下のような register メソッドは不要。
逆にregister メソッドで登録してしまうとカスタムセルが表示されなくなってしまうので注意。
カスタムセルをコードのみで定義、または別途 nib ファイルで定義した場合は viewDidLoad などで以下のように register メソッドで登録する。

self.tableView?.register(MyCell.self, forCellReuseIdentifier: "MyCell")
self.tableView?.register(UINib(nibName: "MyCell", bundle: nil), forCellReuseIdentifier: "MyCell")

また、普通やらないと思うが、カスタムセルを使う場合に UITableViewCell にデフォルトで用意されているプロパティ(textLabelなど)を使うと表示がおかしくなるのでやらないこと。
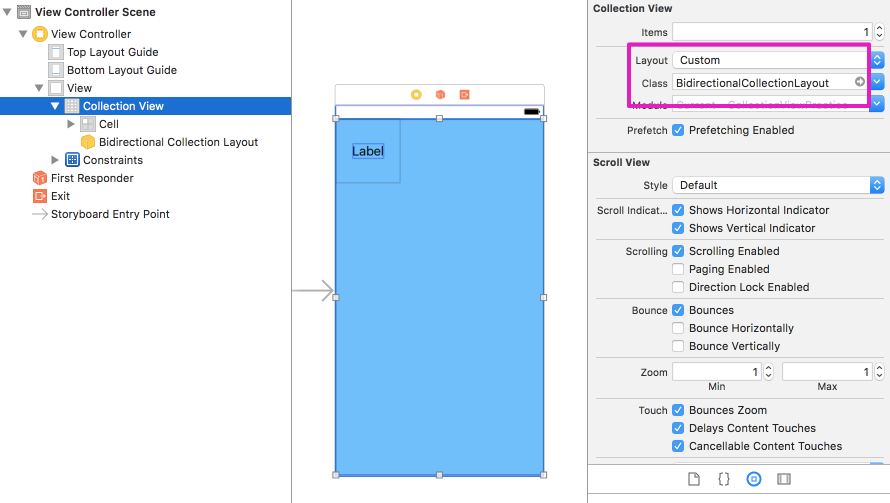
Storyboard

UIViewController に UITableView と UITableViewCell を貼り付ける。
UITableView の datasource と delegate を UIViewController に接続する。
UITableViewCell のクラス名を設定、Identifier を設定。
UITableViewCell 上にラベルなどがあればそれも接続する。

f:id:xyk:20170115202101p:plain f:id:xyk:20170115202043p:plain

Extension

Cell・HeaderFooterViewのregisterやdequeueのIdentifierは文字列で扱うが、大抵はクラス名をそのまま使用するので、文字列ではなく、クラスを使って扱えるようにExtensionを定義する。

定義

extension UITableView {

    // func dequeueReusableCell(withIdentifier identifier: String, for indexPath: IndexPath) -> UITableViewCell
    // の代わりに使用する
    func dequeueReusableCell<T: UITableViewCell>(withClass type: T.Type, for indexPath: IndexPath) -> T {
        return self.dequeueReusableCell(withIdentifier: String(describing: type), for: indexPath) as! T
    }

    // func dequeueReusableHeaderFooterView(withIdentifier identifier: String) -> UITableViewHeaderFooterView?
    // の代わりに使用する
    func dequeueReusableHeaderFooterView<T: UITableViewHeaderFooterView>(withClass type: T.Type) -> T {
        return self.dequeueReusableHeaderFooterView(withIdentifier: String(describing: type)) as! T
    }

    // func register(_ nib: UINib?, forCellReuseIdentifier identifier: String)
    // func register(_ cellClass: Swift.AnyClass?, forCellReuseIdentifier identifier: String)
    // の代わりに使用する
    func register(tableViewCellClass cellClass: AnyClass) {
        let className = String(describing: cellClass)
        if UINib.fileExists(nibName: className) {
            self.register(UINib.cachedNib(nibName: className), forCellReuseIdentifier: className)
        } else {
            self.register(cellClass, forCellReuseIdentifier: className)
        }
    }

    // func register(_ nib: UINib?, forHeaderFooterViewReuseIdentifier identifier: String)
    // func register(_ aClass: Swift.AnyClass?, forHeaderFooterViewReuseIdentifier identifier: String)
    // の代わりに使用する
    func register(headerFooterViewClass aClass: AnyClass) {
        let className = String(describing: aClass)
        if UINib.fileExists(nibName: className) {
            self.register(UINib.cachedNib(nibName: className), forHeaderFooterViewReuseIdentifier: className)
        } else {
            self.register(aClass, forHeaderFooterViewReuseIdentifier: className)
        }
    }
}


extension UINib {

    static let nibCache = NSCache<NSString, UINib>()

    static func fileExists(nibName: String) -> Bool {
        return Bundle.main.path(forResource: nibName, ofType: "nib") != nil
    }

    static func cachedNib(nibName: String) -> UINib {
        if let nib = self.nibCache.object(forKey: nibName as NSString) {
            return nib
        } else {
            let nib = UINib(nibName: nibName, bundle: nil)
            self.nibCache.setObject(nib, forKey: nibName as NSString)
            return nib
        }
    }
}

使用時

// Cellの登録
// tableView.register(MyCell.self, forCellReuseIdentifier: "MyCell")
tableView.register(tableViewCellClass: MyCell.self)

// Cellの取得
// let cell = tableView.dequeueReusableCell(withIdentifier: "MyCell", for: indexPath) as! MyCell
let cell = tableView.dequeueReusableCell(withClass: MyCell.self, for: indexPath)

// HeaderFooterViewの登録(MyHeaderView.nibを使用)
// let className = String(describing: MyHeaderView.self)
// tableView.register(UINib(nibName: className, bundle: nil), forCellReuseIdentifier: className)
tableView.register(headerFooterViewClass: MyHeaderView.self)

// HeaderFooterViewの取得
// let view = tableView.dequeueReusableHeaderFooterView(withIdentifier: "MyHeaderView") as! MyHeaderView
let view = tableView.dequeueReusableHeaderFooterView(withClass: MyHeaderView.self)

Fastlaneでplistを更新する

fastlane: 2.3.0

Fastlaneでplistを更新する方法を調べたのでメモ。
update_info_plistというアクションを使う。
fastlane/update_info_plist.rb at master · fastlane/fastlane · GitHub

app_identifierdisplay_nameについてはアクションのパラメータに直接渡せるが、それ以外は更新するロジックをブロックに書いて渡す。

以下はURL Schemeを環境別に更新する例。
正確なパラメータ名はplistファイルをxmlエディタで開いて確認する。

Fastfile

platform :ios do

  lane :update_url_scheme_dev do
    update_url_scheme(scheme: 'Dev')
  end

  lane :update_url_scheme_beta do
    update_url_scheme(scheme: 'Beta')
  end

  private_lane :update_url_scheme do |options|
    update_info_plist(
            plist_path: 'path/to/Info.plist',
            block: lambda { |plist|
              plist['CFBundleURLTypes'].each {|urlType|
                if urlType['CFBundleURLName'] == 'com.example.default-url-identifier'
                  urlSchemes = urlType['CFBundleURLSchemes']
                  urlSchemes.map! {|urlScheme|
                    TARGET_URL_SCHEME = 'myapp'
                    if urlScheme.start_with?(TARGET_URL_SCHEME)
                      "#{TARGET_URL_SCHEME}-#{options[:scheme].downcase}"
                    else
                      urlScheme
                    end
                  }
                end
              }
            }
    )
  end

end

実行

$ fastlane ios update_url_scheme_beta

XcodeをAppStoreを使わずインストールしたときのメモ

Appleアカウントでログインし、以下からダウンロードする。

https://developer.apple.com/download/
https://developer.apple.com/download/more/
xip ファイルを選択する。
リリース直後だとかなり時間がかかる。
Chrome でダウンロードし、展開しようとしたところ
アーカイブXcode_8.2.xip”は壊れているため展開できません。」
と出て失敗した。何回かやっても同様な現象が出てハマった。
一見、ダウンロードが正常に終了したように見えるのだが、どうやら途中で止まり異常終了していたようだ。
Safari でダウンロードしてみたところ、やはり途中で止まってしまったが右上にあるアイコンから
ダウンロード状況を確認でき、再開させて無事ダウンロードすることができた。
f:id:xyk:20161214153025p:plain で、ダウンロードした xip ファイルをそのまま展開しようとすると
GateKeeperによるファイルの検証が始まりこれがまた時間がかかる。
これは xattr コマンドでファイルの拡張属性com.apple.quarantineを削除することでスキップすることができる。

削除前

$ xattr Xcode_8.2.xip
com.apple.metadata:kMDItemDownloadedDate
com.apple.metadata:kMDItemWhereFroms
com.apple.quarantine

com.apple.quarantine属性を削除

$ xattr -d com.apple.quarantine Xcode_8.2.xip

削除後

$ xattr Xcode_8.2.xip
com.apple.metadata:kMDItemDownloadedDate
com.apple.metadata:kMDItemWhereFroms

UIViewに角丸な枠線(破線/点線)を設定する

環境: Swift3

UIViewの角を丸くした枠線を書くには以下のように書けばよい。

let roundView = UIView()
roundView.backgroundColor = .lightGray
roundView.layer.borderColor = UIColor.blue.cgColor
roundView.layer.borderWidth = 3
roundView.layer.cornerRadius = 10
roundView.layer.masksToBounds = true
// roundView.clipsToBounds = true // masksToBounds と同じ

さらに枠線を破線にしたいのでCAShapeLayerを使って以下のように実装した。

以下がプレイグラウンドで確認した完成画像となる。

import UIKit
import PlaygroundSupport

final class DashedBorderAroundView: UIView {
    
    override func layoutSublayers(of layer: CALayer) {
        super.layoutSublayers(of: layer)
        
        if self.dashedBorderLayer.superlayer == nil {
            self.layer.addSublayer(self.dashedBorderLayer)
            // self.layer.insertSublayer(self.dashedBorderLayer, at: 0)
            self.layer.cornerRadius = 10
        }
    }
    
    private lazy var dashedBorderLayer: CAShapeLayer = { [unowned self] in
        
        let rect = self.bounds
        let cornerRadius: CGFloat = 10
        
        let path = UIBezierPath()
        
        path.move(to: CGPoint(x: 0, y: rect.maxY - cornerRadius)) // 1
        path.addLine(to: CGPoint(x: 0, y: cornerRadius)) // 2
        path.addArc(withCenter: CGPoint(x: cornerRadius, y: cornerRadius), // 3
                    radius: cornerRadius,
                    startAngle: CGFloat(M_PI),
                    endAngle: -CGFloat(M_PI_2),
                    clockwise: true)
        path.addLine(to: CGPoint(x: rect.maxX - cornerRadius, y: 0)) // 4
        path.addArc(withCenter: CGPoint(x: rect.maxX - cornerRadius, y: cornerRadius), // 5
                    radius: cornerRadius,
                    startAngle: -CGFloat(M_PI_2),
                    endAngle: 0,
                    clockwise: true)
        path.addLine(to: CGPoint(x: rect.maxX, y: rect.maxY - cornerRadius)) // 6
        path.addArc(withCenter: CGPoint(x: rect.maxX - cornerRadius, y: rect.maxY - cornerRadius), // 7
                    radius: cornerRadius,
                    startAngle: 0,
                    endAngle: CGFloat(M_PI_2),
                    clockwise: true)
        path.addLine(to: CGPoint(x: cornerRadius, y: rect.maxY)) // 8
        path.addArc(withCenter: CGPoint(x: cornerRadius, y: rect.maxY - cornerRadius), // 9
                    radius: cornerRadius,
                    startAngle: CGFloat(M_PI_2),
                    endAngle: CGFloat(M_PI),
                    clockwise: true)
        
        let shapeLayer = CAShapeLayer()
        shapeLayer.fillColor = UIColor.clear.cgColor
        shapeLayer.strokeColor = UIColor.blue.cgColor
        shapeLayer.lineWidth = 3
        shapeLayer.lineDashPattern = [3, 6]
        shapeLayer.lineCap = kCALineJoinRound
        shapeLayer.path = path.cgPath
        
        return shapeLayer
    }()
    
}

let view = UIView(frame: CGRect(x: 0, y: 0, width: 200, height: 200))
view.backgroundColor = .white

let dView = DashedBorderAroundView(frame: CGRect(x: 0, y: 0, width: 100, height: 100))
dView.backgroundColor = .lightGray
dView.center = view.center
view.addSubview(dView)

PlaygroundPage.current.liveView = view

パスの描画部分がわかりづらいので図で補足説明を追加。

回転方向

パスの順番