xyk blog

最近は iOS 開発の記事が多めです。

CGPath の変化をアニメーションさせるサンプル

環境: Xcode8.2.1, Swift3

CGPath の変化をアニメーションさせる方法を試した。
気をつける点としては変更前と変更後のパスの数を同じにしておくこと。

import UIKit
import PlaygroundSupport

class SquareButton: UIControl {
    
    let pathLayer = CAShapeLayer()
    var squarePath: UIBezierPath!
    var halfMoonPath: UIBezierPath!
    
    required init?(coder aDecoder: NSCoder) {
        super.init(coder: aDecoder)
    }
    
    override init(frame: CGRect) {
        super.init(frame: frame)
        
        self.squarePath = self.squarePath(rect: frame)
        self.halfMoonPath = self.halfMoonPath(rect: frame)
        
        self.pathLayer.fillColor = UIColor.orange.cgColor
        self.pathLayer.strokeColor = UIColor.white.cgColor
        self.pathLayer.lineWidth = 4
        self.pathLayer.path = self.squarePath.cgPath
        self.layer.addSublayer(self.pathLayer)
    }
    
    override func endTracking(_ touch: UITouch?, with event: UIEvent?) {
        super.endTracking(touch, with: event)
        
        self.toggle()
    }
    
    func toggle() {
        
        let anim = CABasicAnimation(keyPath: "path")
        
        if self.isSelected {
            anim.fromValue = self.halfMoonPath.cgPath
            anim.toValue = self.squarePath.cgPath
        } else {
            anim.fromValue = self.squarePath.cgPath
            anim.toValue = self.halfMoonPath.cgPath
        }
        
        anim.duration = 0.4
        anim.fillMode = kCAFillModeForwards
        anim.isRemovedOnCompletion = false
        
        self.pathLayer.add(anim, forKey: "animatePath")
        
        self.isSelected = !self.isSelected
    }
    
    func squarePath(rect: CGRect) -> UIBezierPath {
        
        let initialPoint = CGPoint(x: 0, y: 0)
        let curveStart = CGPoint(x: rect.maxX * 0.05, y: 0)
        let curveControl = CGPoint(x: rect.maxX * 0.5, y: 0)
        let curveEnd = CGPoint(x: rect.maxX * 0.95, y: 0)
        let firstCorner = CGPoint(x: rect.maxX, y: 0)
        let secondCorner = CGPoint(x: rect.maxX, y: rect.maxY)
        let thirdCorner = CGPoint(x: 0, y: rect.maxY)
        
        let myBezier = UIBezierPath()
        myBezier.move(to: initialPoint)
        myBezier.addLine(to: curveStart)
        myBezier.addQuadCurve(to: curveEnd, controlPoint: curveControl)
        myBezier.addLine(to: firstCorner)
        myBezier.addLine(to: secondCorner)
        myBezier.addLine(to: thirdCorner)
        
        myBezier.close()
        return myBezier
    }
    
    func halfMoonPath(rect: CGRect) -> UIBezierPath {
        
        let initialPoint = CGPoint(x: 0, y: 0)
        let curveStart = CGPoint(x: rect.maxX * 0.05, y: 0)
        let curveControl = CGPoint(x: rect.maxX * 0.5, y: rect.maxY * 0.6)
        let curveEnd = CGPoint(x: rect.maxX * 0.95, y: 0)
        let firstCorner = CGPoint(x: rect.maxX, y: 0)
        let secondCorner = CGPoint(x: rect.maxX, y: rect.maxY)
        let thirdCorner = CGPoint(x: 0, y: rect.maxY)
        
        let myBezier = UIBezierPath()
        myBezier.move(to: initialPoint)
        myBezier.addLine(to: curveStart)
        myBezier.addQuadCurve(to: curveEnd, controlPoint: curveControl)
        myBezier.addLine(to: firstCorner)
        myBezier.addLine(to: secondCorner)
        myBezier.addLine(to: thirdCorner)
        
        myBezier.close()
        return myBezier
    }

}

let baseView = UIView(frame: CGRect(x: 0, y: 0, width: 300, height: 200))
baseView.backgroundColor = UIColor(red: 38.0/255, green: 151.0/255, blue: 68.0/255, alpha: 1)

let button = SquareButton(frame: CGRect(x: 0, y: 0, width: 50, height: 50))
baseView.addSubview(button)
button.center = baseView.center

PlaygroundPage.current.liveView = baseView

UIScrollView で現在のページ数を取得する

環境: Xcode8.2.1, Swift3

UIScrollViewのisPagingEnabledプロパティを true にすると、ページ単位のスクロールが可能になる。
このときに現在のページ数を求める方法についてメモ。

ページングは横スクロールの場合なら UIScrollView のcontentOffset.xUIScrollView.bounds.widthの半分を超えたところでドラッグを離すと隣のページに進み、半分を超えてなければ元のページに戻る挙動になっている。
まず、その時点のcontentOffset.xからページ数を計算する Extension を追加する。

extension UIScrollView {
    var currentPage: Int {
        return Int((self.contentOffset.x + (0.5 * self.bounds.width)) / self.bounds.width) + 1
    }
}

で、今回はページングのスクロールが完全に止まったタイミングでページ数を取得する方法を考える。

スクロールが完全に止まったタイミングを検出するには前回調べた UIScrollViewDelegate のメソッドに仕掛ければよい。
基本scrollViewDidEndDeceleratingのみで良いと思う(isPagingEnabled=trueはページの区切りまで自動スクロールするので)が、この Delegate はドラッグをピタッと止めた場合は呼ばれないので、その時でも検出できるように念のためscrollViewDidEndDraggingでかつdecelerate=falseの場合にも取得するようにしておく。

// MARK: - UIScrollViewDelegate

func scrollViewDidEndDragging(_ scrollView: UIScrollView, willDecelerate decelerate: Bool) {
    if !decelerate {
        print("currentPage:", scrollView.currentPage)
    }
}

func scrollViewDidEndDecelerating(_ scrollView: UIScrollView) {
    print("currentPage:", scrollView.currentPage)
}

これでページ数が切り替わった(ページングのスクロールが止まった)時に1度のみページ数が表示される。

UIScrollView の keyboardDismissMode を設定してドラッグ時に自動でキーボードを閉じる

環境: Xcode8.2.1, Swift3

UIScrollView 上に UITextField / UITextView を乗せている場合はkeyboardDismissModeプロパティを設定することで自動でキーボードを閉じることができる。

Storyboardの場合

f:id:xyk:20170309155712p:plain

コードの場合

// デフォルト設定。UIScrollView をドラッグしてもキーボードは閉じない
self.scrollView.keyboardDismissMode = .none

// dismisses the keyboard when a drag begins
// UIScrollView のドラッグ開始時にキーボードを閉じる
self.scrollView.keyboardDismissMode = .onDrag

// the keyboard follows the dragging touch off screen, and may be pulled upward again to cancel the dismiss
// UIScrollView を下方向ドラッグで上にスクロールするのに合わせてキーボードを閉じる
self.scrollView.keyboardDismissMode = .interactive

Dissmiss on drag設定時は UIScrollView のドラッグを開始するとすぐキーボードが閉じられる。
これを設定しておけばよさそう。

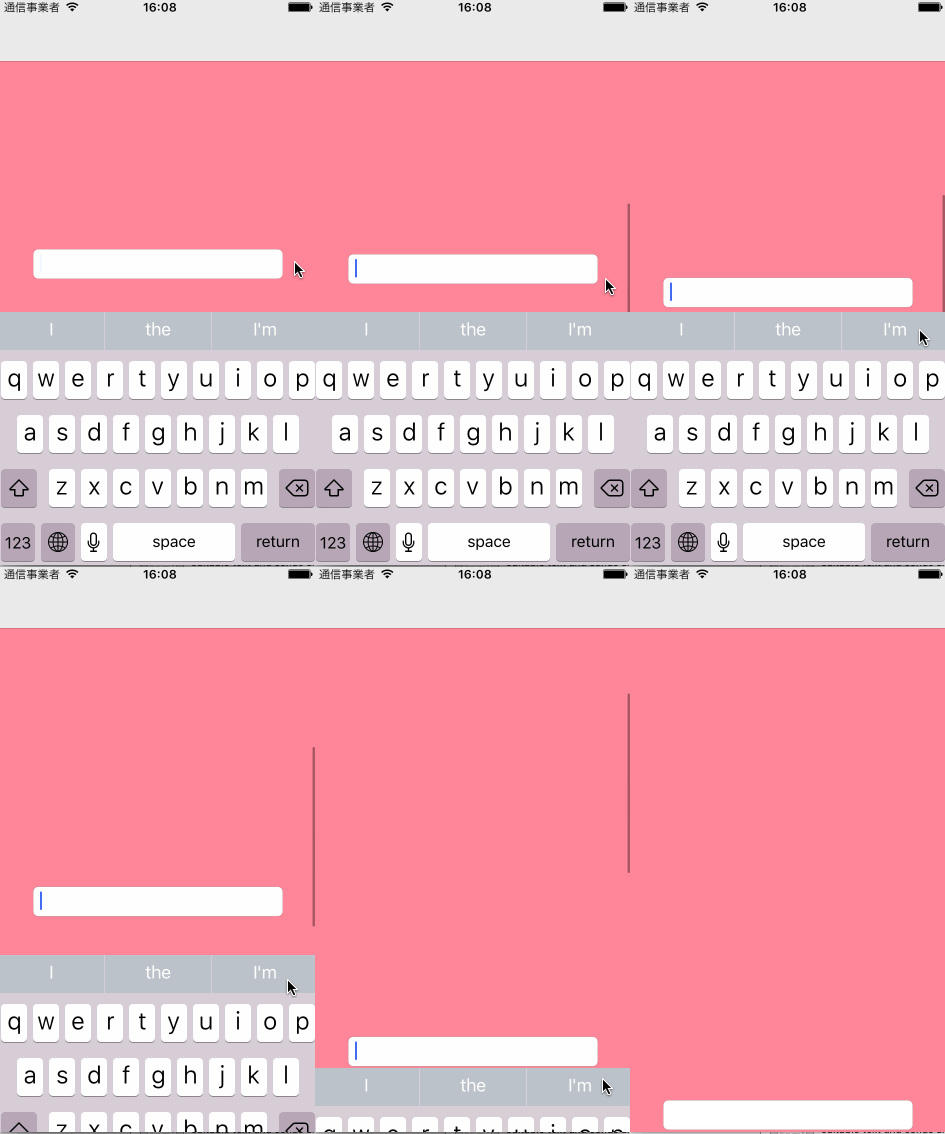
Dissmiss interactively設定時の挙動は以下のようになる。

f:id:xyk:20170309161010g:plain

UIScrollViewDelegate について

環境: Xcode8.2.1, Swift3

UIScrollView のドラッグによるスクロール時に呼ばれる UIScrollViewDelegate の順番

// MARK: - UIScrollViewDelegate

// any offset changes
// スクロール中は常に呼ばれる
func scrollViewDidScroll(_ scrollView: UIScrollView) {

}

// 1. called on start of dragging (may require some time and or distance to move)
// ドラッグ開始時
func scrollViewWillBeginDragging(_ scrollView: UIScrollView) {

}

// ここから下はドラッグ状態から指を離した後に呼ばれる

// 2. called on finger up if the user dragged. velocity is in points/millisecond. targetContentOffset may be changed to adjust where the scroll view comes to rest
// ドラッグの終わりの始まり
func scrollViewWillEndDragging(_ scrollView: UIScrollView, withVelocity velocity: CGPoint, targetContentOffset: UnsafeMutablePointer<CGPoint>) {

}

// 3. called on finger up if the user dragged. decelerate is true if it will continue moving afterwards
// ドラッグの終わり
// decelerate が true ならまだ減速しながらスクロール中、false ならスクロールは止まっている。
// ドラッグをピタッと止めて、慣性なしでドラッグを終えた場合に decelerate = false になる。  
func scrollViewDidEndDragging(_ scrollView: UIScrollView, willDecelerate decelerate: Bool) {

}

// 4. called on finger up as we are moving
// 減速開始時 -> ★呼ばれない場合あり
// 3 で decelerate が true であれば呼ばれ、false であれば呼ばれない。
func scrollViewWillBeginDecelerating(_ scrollView: UIScrollView) {

}

// 5. called when scroll view grinds to a halt
// 減速終了時 -> ★呼ばれない場合あり
// 4 と同様に 3 で decelerate が true であれば呼ばれ、false であれば呼ばれない。
func scrollViewDidEndDecelerating(_ scrollView: UIScrollView) {

}

UIScrollView をプログラムでスクロールさせた場合に呼ばれる UIScrollDelegate の順番

例えば以下のようなコードでアニメーション付きでスクロールさせた場合

scrollView.setContentOffset(CGPoint(x: 320, y: 0), animated: true)

この場合は上記1~5のドラッグ系 Delegate は呼ばれずscrollViewDidScrollscrollViewDidEndScrollingAnimationのみ呼ばれる。

// MARK: - UIScrollViewDelegate

func scrollViewDidEndScrollingAnimation(_ scrollView: UIScrollView) {

}

順番は以下のようになる。

scrollViewDidScroll
...
...
...
scrollViewDidScroll
scrollViewDidEndScrollingAnimation

ちなみに以下のようにアニメーションなしでスクロールさせた場合は

scrollView.setContentOffset(CGPoint(x: 320, y: 0), animated: false)

scrollViewDidEndScrollingAnimationは呼ばれずscrollViewDidScrollが1度だけ呼ばれる。

scrollViewDidScroll

UIScrollView の Bounce 設定について

環境: Xcode8.2.1, Swift3

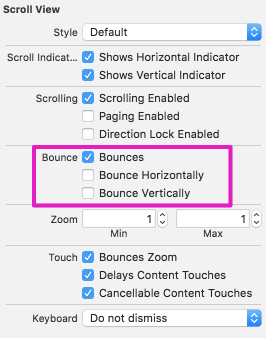
UIScrollView の Bounce 設定のパラメータが3つあるが、これらの違いについて調べた。

Storyboard
以下がデフォルトの設定
f:id:xyk:20170308131140p:plain

コード

// UIScrollView

// default YES. if YES, bounces past edge of content and back again
open var bounces: Bool 

// default NO. if YES and bounces is YES, even if content is smaller than bounds, allow drag vertically
open var alwaysBounceVertical: Bool 

// default NO. if YES and bounces is YES, even if content is smaller than bounds, allow drag horizontally
open var alwaysBounceHorizontal: Bool 

組み合わせ1(デフォルト)

parameter value
Bounces true
Bounce Horizontally false
Bounce Vertically false

UIScrollView に追加したビューのcontentSizescrollView.frame.sizeより大きい場合のみ、バウンスが発生する。
つまり
scrollView.frame.width < contentSize.widthであれば、横スクロール時に画面端でバウンス発生、
scrollView.frame.height < contentSize.heightであれば、縦スクロール時に画面端でバウンス発生する。
scrollView.frame.width >= contentSize.widthまたは
scrollView.frame.height >= contentSize.heightであればバウンスは発生しない。

組み合わせ2

parameter value
Bounces true
Bounce Horizontally true
Bounce Vertically false

横方向スクロール時に必ずバウンスが発生する。
contentSize.widthscrollView.frame.widthより小さくてもバウンスする。

組み合わせ3

parameter value
Bounces true
Bounce Horizontally false
Bounce Vertically true

縦方向スクロール時に必ずバウンスが発生する。
contentSize.heightscrollView.frame.heightより小さくてもバウンスする。

組み合わせ4

parameter value
Bounces true
Bounce Horizontally true
Bounce Vertically true

縦方向、縦方向ともにスクロール時に必ずバウンスが発生する。
contentSizescrollView.frame.sizeより小さくてもバウンスする。

残りの組み合わせ

parameter value
Bounces false
Bounce Horizontally false
Bounce Vertically false
parameter value
Bounces false
Bounce Horizontally true
Bounce Vertically false
parameter value
Bounces false
Bounce Horizontally false
Bounce Vertically true

縦方向、縦方向ともにスクロール時にバウンスしない。
つまり、Bouncesを false にするとBounce HorizontallyBounce Verticallyの設定にかかわらずバウンスが発生しなくなる。

Storyboard 上で UIScrollView を AutoLayout を使って設定する

環境: Xcode8.2.1, Swift3

Storyboard 上で UIScrollView を AutoLayout を使って設定する方法について。
ちょっとハマったのでメモ。

ビューの階層構造は
UIViewController.view -> UIScrollView -> UIView
とする。

f:id:xyk:20170308121658p:plain

UIScrollView の制約

UIScrollView の制約は以下のように上下左右に設定。
f:id:xyk:20170308121705p:plain

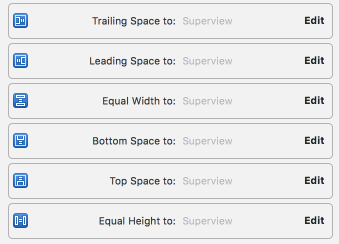
UIScrollView上に追加する UIView の制約

UIScrollView上に追加する UIView の制約は以下のように設定。
制約はすべて Superview である UIScrollView に対して設定を行う。
上下左右の制約に加え、widthheight の制約も必要になる。
今回は UIScrollView の width , height と Equal な制約を追加する。
これにより UIScrollView のcontentSizeが決定する。
f:id:xyk:20170308121710p:plain

ちなみにControlを押しながらViewからUIScrollViewドラッグ&ドロップすると簡単に制約追加できる。
f:id:xyk:20170308130155p:plain
こんな感じになる。
f:id:xyk:20170308130220p:plain

Adjust Scroll View insets の設定

UIViewController の Adjust Scroll View insetsのチェックは外しておく。
(コード上ならself.automaticallyAdjustsScrollViewInsets = falseとなる)
f:id:xyk:20170308121713p:plain

UIViewController の Adjust Scroll View insets
UIViewController.view.subviews[0] が対象になるとのこと。

今回のケースではUIScrollViewに対して自動調整が設定されるが、UIScrollViewの上側の制約はtopLayoutGuideと Equal の設定をしており、ここからさらに更に余白(64pt)が追加されてしまうのでオフとしておく。


複数ビューを並べる例

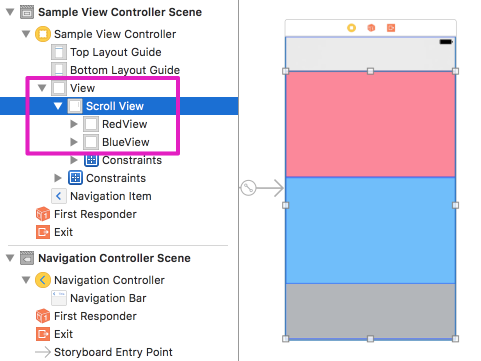
ビューの階層構造は以下のような複数ビューを並べる場合。

UIViewController.view -> UIScrollView --> UIView1
                                      └-> UIView2

こんな感じ。

f:id:xyk:20170309104338p:plain

UIScrollView の制約

先ほどの例と同じ。

RedView の制約

上下左右の制約とwidth、heightの制約を追加。

f:id:xyk:20170309104407p:plain

BlueView の制約

上下左右の制約とheightの制約を追加。

f:id:xyk:20170309104410p:plain

これでcontentSizeが決定したため制約エラーがなくなり、設定が完了した。

SwiftでAVAudioPlayerを使ってサウンドファイルを再生する

環境: Swift3

前回はAudioServicesPlaySystemSoundでサウンドファイルを再生したが、今回はAVAudioPlayerを使って再生する例。
AVAudioPlayerインスタンスは強参照する。

import AVFoundation

var audioPlayer: AVAudioPlayer?

func playSound() {
    do {
        self.audioPlayer?.stop()
        self.audioPlayer = try AVAudioPlayer(contentsOf: Bundle.main.url(forResource: "pico", withExtension: "mp3")!)
        self.audioPlayer?.volume = 0.7
        self.audioPlayer?.numberOfLoops = 0 // 1回再生。-1で無限ループ
        self.audioPlayer?.prepareToPlay()
        self.audioPlayer?.play()
    } catch {
        print(error)
    }
}

Swiftで短いサウンドファイルを再生する

環境: Swift3

今回はpico.mp3という効果音ファイルがあり、それを再生する例。
まずは、このファイルをXcodeのプロジェクトに右クリックのAdd Files to **から追加する。
TARGETのBuild Phases->Copy Bundle Resourcesに追加したファイルが含まれていることを確認する。
そして以下コードを実行する。

import AudioToolbox

func playSound() {
    let url = Bundle.main.url(forResource: "pico", withExtension: "mp3")!
    var soundID: SystemSoundID = 0
    AudioServicesCreateSystemSoundID(url as CFURL, &soundID)
    AudioServicesPlaySystemSound(soundID)
}

これで再生することはできた。
が、調べていくとサウンドリソースの解放処理も入れたほうがよいらしい。
そこでPlayの後にDisposeを入れてみると、サウンドが再生されなくなった。

func playSound() {
    let url = Bundle.main.url(forResource: "pico", withExtension: "mp3")!
    var soundID: SystemSoundID = 0
    AudioServicesCreateSystemSoundID(url as CFURL, &soundID)
    AudioServicesPlaySystemSound(soundID)
    AudioServicesDisposeSystemSoundID(soundID) // サウンドが再生されなくなった
}

サウンド再生完了後に処理を実行できるAudioServicesAddSystemSoundCompletionというコールバック関数(クロージャの第1引数にsoundIDが入ってくる)があったので、そこでDisposeするように修正した。

func playSound() {
    let url = Bundle.main.url(forResource: "pico", withExtension: "mp3")!
    var soundID: SystemSoundID = 0
    AudioServicesCreateSystemSoundID(url as CFURL, &soundID)
    AudioServicesAddSystemSoundCompletion(soundID, nil, nil, { (soundID, _) in
        AudioServicesDisposeSystemSoundID(soundID)
    }, nil)
    AudioServicesPlaySystemSound(soundID)
}

これでOK

AudioServicesPlaySystemSoundで再生したサウンドの音量が変更できない問題

AudioServicesPlaySystemSoundで再生したサウンドの音量が固定でiPhoneの音量設定に合わせて変更できないことに気づいた。
一応、iPhoneの設定-> サウンドと触覚 -> ボタンで変更 をONにすることでiPhoneの音量設定に合わせて変更できるようになる。

f:id:xyk:20170221103719p:plain f:id:xyk:20170221103721p:plain

ここがOFFだとアプリ側では制御できないので、音量を制御したい場合はAVAudioPlayerを使ったほうがよいかもしれない。

UICollectionViewで縦横両方向にスクロールさせる

環境: Swift3

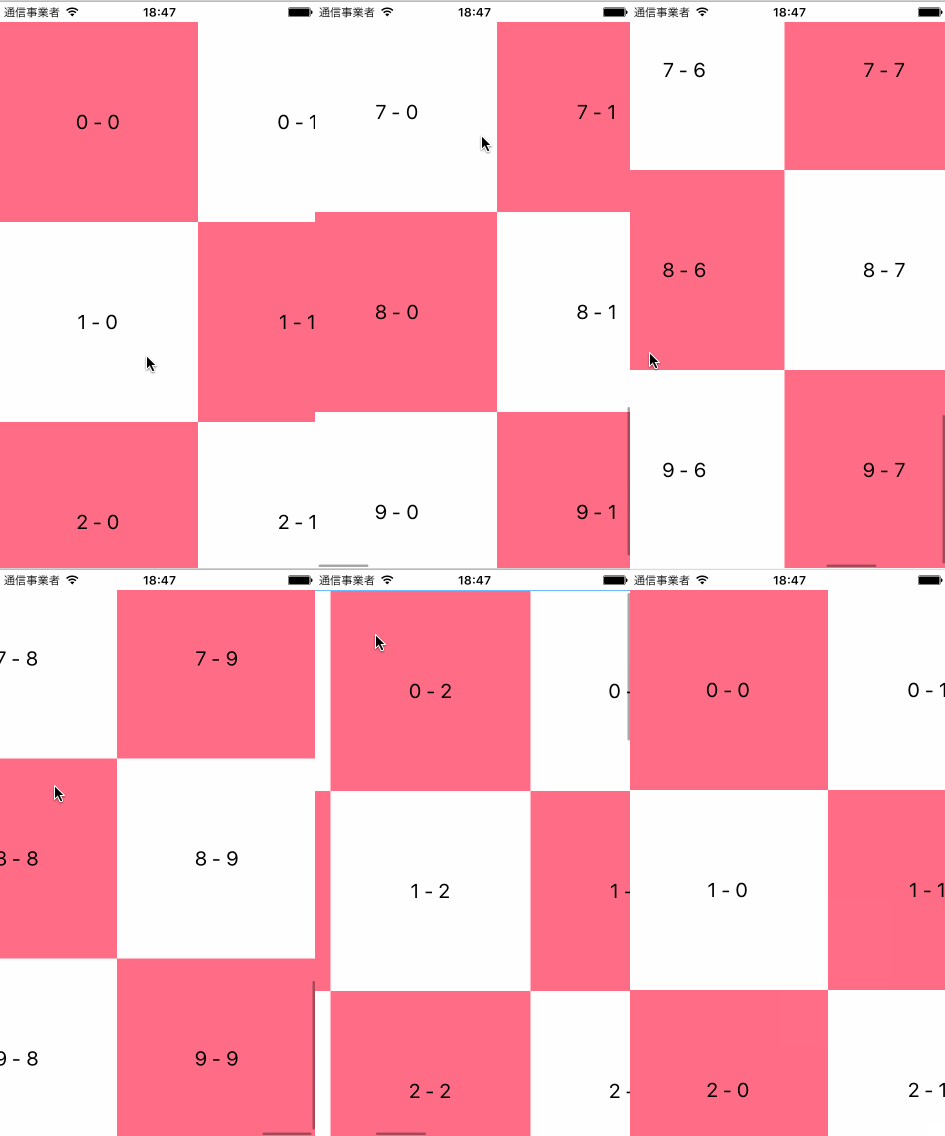
f:id:xyk:20170209184815g:plain

コレクションビューで縦横どちらにもスクロールさせることはできるか調べてみた。
デフォルトのレイアウトクラスであるUICollectionViewLayoutでは縦横どちらかの方向にしかスクロールできないようだ。

コレクションビューではUICollectionViewLayoutを継承したクラスでレイアウトを管理する。
縦横にセルを並べたフローレイアウト用のUICollectionViewFlowLayoutが標準で用意されている。
StoryBoard上でUICollectionViewを貼り付けた場合、これがデフォルトで使用されるようになっている。
これを使った場合は基本的に縦横どちらかの方向にしかスクロールできない。
f:id:xyk:20170209180511p:plain

まず、UICollectionViewFlowLayoutを継承したカスタムクラスBidirectionalCollectionLayoutを用意する。
やっていることは、最初にすべてのセルを含んだ縦幅、横幅の計算とUICollectionViewLayoutAttributes(レイアウト属性を管理するオブジェクト)の作成をしてキャッシュする。
func layoutAttributesForElements(in rect: CGRect)ではrect 内のすべてのセルのレイアウト属性を返す、
func layoutAttributesForItem(at indexPath: IndexPath)では indexPath で示されるアイテムのレイアウト属性を返す。

import UIKit

final class BidirectionalCollectionLayout: UICollectionViewFlowLayout {
    
    weak var delegate: UICollectionViewDelegateFlowLayout?
    
    private var layoutInfo: [IndexPath : UICollectionViewLayoutAttributes] = [:]
    private var maxRowsWidth: CGFloat = 0
    private var maxColumnHeight: CGFloat = 0
    
    private func calcMaxRowsWidth() {
        
        guard
            let collectionView = self.collectionView,
            let delegate = self.delegate
        else { return }
        
        var maxRowWidth: CGFloat = 0
        for section in 0..<collectionView.numberOfSections {
            var maxWidth: CGFloat = 0
            for item in 0..<collectionView.numberOfItems(inSection: section) {
                let indexPath = IndexPath(item: item, section: section)
                let itemSize = delegate.collectionView!(collectionView, layout: self, sizeForItemAt: indexPath)
                maxWidth += itemSize.width
            }
            maxRowWidth = maxWidth > maxRowWidth ? maxWidth : maxRowWidth
        }
        
        self.maxRowsWidth = maxRowWidth
    }
    
    private func calcMaxColumnHeight() {
        
        guard
            let collectionView = self.collectionView,
            let delegate = self.delegate
        else { return }
        
        var maxHeight: CGFloat = 0
        for section in 0..<collectionView.numberOfSections {
            var maxRowHeight: CGFloat = 0
            for item in 0..<collectionView.numberOfItems(inSection: section) {
                let indexPath = IndexPath(item: item, section: section)
                let itemSize = delegate.collectionView!(collectionView, layout: self, sizeForItemAt: indexPath)
                maxRowHeight = itemSize.height > maxRowHeight ? itemSize.height : maxRowHeight
            }
            maxHeight += maxRowHeight
        }
        
        self.maxColumnHeight = maxHeight
    }
    
    private func calcCellLayoutInfo() {
        
        guard
            let collectionView = self.collectionView,
            let delegate = self.delegate
        else { return }
        
        var cellLayoutInfo: [IndexPath : UICollectionViewLayoutAttributes] = [:]
        
        var originY: CGFloat = 0
        
        for section in 0..<collectionView.numberOfSections {
            
            var height: CGFloat = 0
            var originX: CGFloat = 0
            
            for item in 0..<collectionView.numberOfItems(inSection: section) {
                let indexPath = IndexPath(item: item, section: section)
                let itemAttributes = UICollectionViewLayoutAttributes(forCellWith: indexPath)
                
                let itemSize = delegate.collectionView!(collectionView, layout: self, sizeForItemAt: indexPath)
                itemAttributes.frame = CGRect(x: originX, y: originY, width: itemSize.width, height: itemSize.height)
                cellLayoutInfo[indexPath] = itemAttributes
                
                originX += itemSize.width
                height = height > itemSize.height ? height : itemSize.height
            }
            originY += height
        }
        
        self.layoutInfo = cellLayoutInfo
    }
    
    override func prepare() {
        
        self.delegate = self.collectionView?.delegate as? UICollectionViewDelegateFlowLayout
        
        self.calcMaxRowsWidth()
        self.calcMaxColumnHeight()
        self.calcCellLayoutInfo()
    }
    
    override func layoutAttributesForElements(in rect: CGRect) -> [UICollectionViewLayoutAttributes]? {
        
        var allAttributes: [UICollectionViewLayoutAttributes] = []
        for attributes in self.layoutInfo.values {
            
            if rect.intersects(attributes.frame) {
                allAttributes.append(attributes)
            }
        }
        
        return allAttributes
    }
    
    override func layoutAttributesForItem(at indexPath: IndexPath) -> UICollectionViewLayoutAttributes? {
        
        return self.layoutInfo[indexPath]
    }
    
    override var collectionViewContentSize: CGSize {
        
        return CGSize(width: self.maxRowsWidth, height: self.maxColumnHeight)
    }

}

続いてViewControllerの実装。
横方向のセル数はnumberOfItemsInSectionで、縦方向のセル数はnumberOfSectionsで定義する。
今回は10x10用意した。

import UIKit

class ViewController: UIViewController {
    
    @IBOutlet weak var collectionView: UICollectionView!
    
    override func viewDidLoad() {
        super.viewDidLoad()
    }
    
}

extension ViewController: UICollectionViewDataSource {
    
    func collectionView(_ collectionView: UICollectionView, numberOfItemsInSection section: Int) -> Int {
        
        return 10
    }
    
    func numberOfSections(in collectionView: UICollectionView) -> Int {
        
        return 10
    }
    
    func collectionView(_ collectionView: UICollectionView, cellForItemAt indexPath: IndexPath) -> UICollectionViewCell {
        
        let cell = collectionView.dequeueReusableCell(withReuseIdentifier: "Cell", for: indexPath) as! CollectionViewCell
        let position = "\(indexPath.section) - \(indexPath.row)"
        cell.titleLabel.text = position
        
        if indexPath.section % 2 == 0 {
            if indexPath.row % 2 == 0 {
                cell.backgroundColor = UIColor(hex: 0xff6e86)
            } else {
                cell.backgroundColor = .white
            }
        } else {
            if indexPath.row % 2 == 0 {
                cell.backgroundColor = .white
            } else {
                cell.backgroundColor = UIColor(hex: 0xff6e86)
            }
        }

        return cell
    }
}

extension ViewController: UICollectionViewDelegate {
    
    func collectionView(_ collectionView: UICollectionView, didSelectItemAt indexPath: IndexPath) {
        
        let position = "\(indexPath.section) - \(indexPath.row)"
        print("didSelect:", position)
    }
}

extension ViewController: UICollectionViewDelegateFlowLayout {
    
    func collectionView(_ collectionView: UICollectionView, layout collectionViewLayout: UICollectionViewLayout, sizeForItemAt indexPath: IndexPath) -> CGSize {
        
        return CGSize(width: 200, height: 200)
    }
    
}

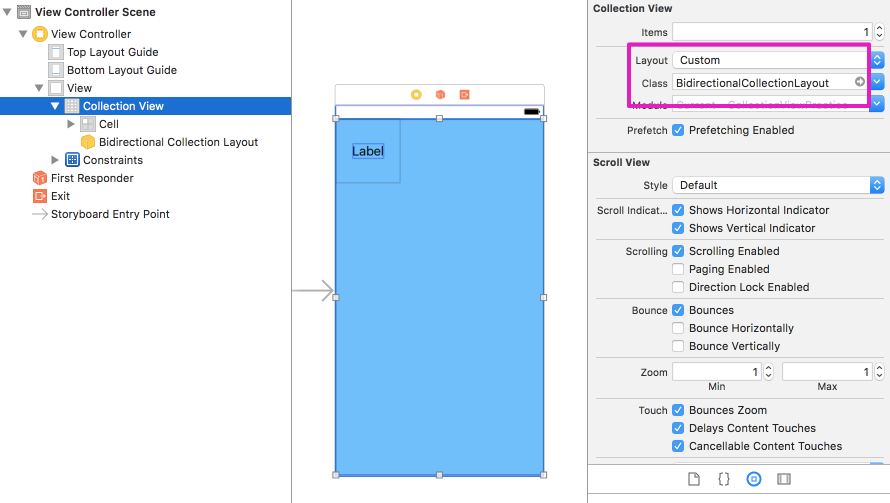
StoryBoardから作成したレイアウトクラスを設定する。

f:id:xyk:20170209182000p:plain

Font Awesome を Xcode で使用する

環境: swift3

fontawesome.io

FontAwesome をXcodeにカスタムフォントとして取り込んで使用する方法。

以下からFontAwesome.otfをダウンロードする

https://github.com/FortAwesome/Font-Awesome/blob/master/fonts/FontAwesome.otf

Xcode のプロジェクト内にコピーして取り込む

この時、Build PhasesCopy Bundle Resourcesに追加されているか確認する。
追加されてなければ追加する。

Info.plist にキーUIAppFontsFontAwesome.otfを追加する

f:id:xyk:20170208161417p:plain

ソースコードを直接見ると以下のようになっている。

<key>UIAppFonts</key>
<array>
    <string>FontAwesome.otf</string>
</array>

追加したフォントをコードから利用する

http://fontawesome.io/cheatsheet/
こちらを参考にUnicodeで指定する。

let attr = [
    NSForegroundColorAttributeName: UIColor.gray,
    NSFontAttributeName: UIFont(name: "FontAwesome", size: 20)!,
]
self.textLabel?.attributedText = NSAttributedString(string: "\u{f013}", attributes: attr)