xyk blog

最近は iOS 開発の記事が多めです。

MKMapView 上のタップした地点を中心にして正方形を描く

検証環境:
Xcode 12
Swift 5.3

f:id:xyk:20201111134019j:plain

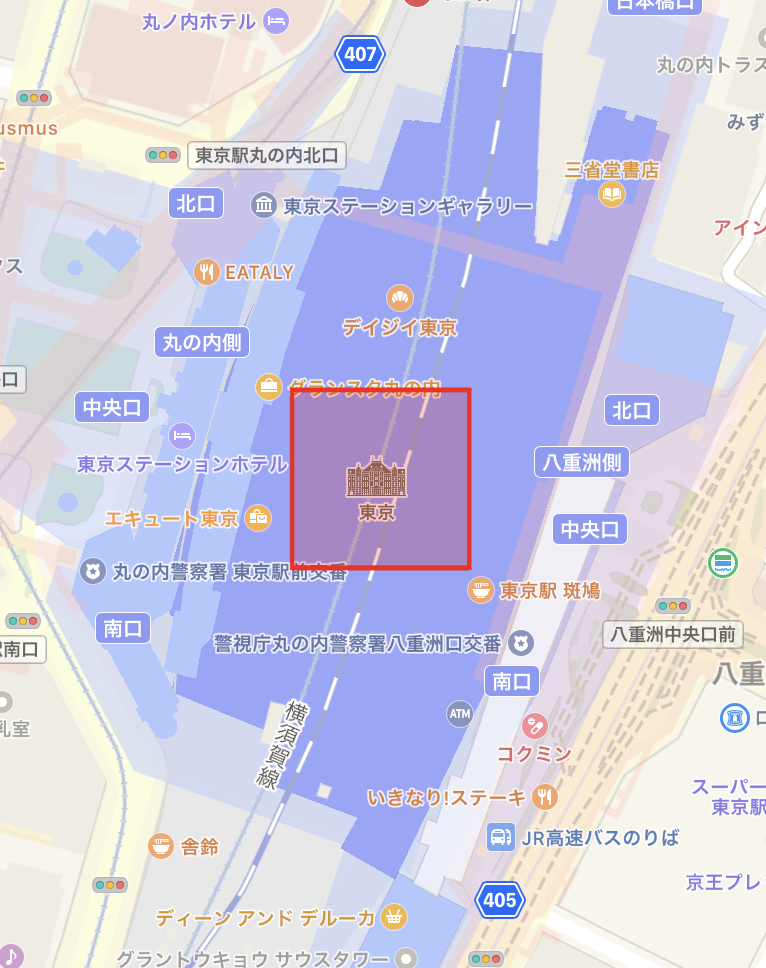
前回は地図上(MKMapView)に円を描画したが、今回は正方形の矩形を描画してみる。

まずMapKitをインポートしておく。

import MapKit
  • MKMapView にUITapGestureRecognizerを追加してタップを検出する。
let tapGesture = UITapGestureRecognizer(target: self, action: #selector(mapTapped(_:)))
mapView.addGestureRecognizer(tapGesture)
  • この時呼び出すmapTappedメソッドを定義する。
    前回の円の場合はMKCircleだったが、今回はMKPolygonオブジェクトを作成してMKMapView#addOverlayで追加する。
    MKPolygon には4つの緯度経度を追加する。
@objc func mapTapped(_ sender: UITapGestureRecognizer) {
    if sender.state == .ended {
        let tapPoint = sender.location(in: mapView)
        // タップした座標(CGPoint)を緯度経度(CLLocationCoordinate2D)に変換する
        let center = mapView.convert(tapPoint, toCoordinateFrom: view)
        // 100m四方のRegionを作成
        let region = MKCoordinateRegion(center: center, latitudinalMeters: 100, longitudinalMeters: 100)
        
        // 4点の緯度経度を算出する
        let leftTop = CLLocationCoordinate2D(latitude: center.latitude - region.span.latitudeDelta / 2, longitude: center.longitude - region.span.longitudeDelta / 2)
        let rightTop = CLLocationCoordinate2D(latitude: center.latitude + region.span.latitudeDelta / 2, longitude: center.longitude - region.span.longitudeDelta / 2)
        let rightBottom = CLLocationCoordinate2D(latitude: center.latitude + region.span.latitudeDelta / 2, longitude: center.longitude + region.span.longitudeDelta / 2)
        let leftBottom = CLLocationCoordinate2D(latitude: center.latitude - region.span.latitudeDelta / 2, longitude: center.longitude + region.span.longitudeDelta / 2)
        
        var coordinates = [leftTop, rightTop, rightBottom, leftBottom]
        let polygon = MKPolygon(coordinates: &coordinates, count: coordinates.count)
        mapView.addOverlay(polygon)
    }
}

MKCoordinateSpan の latitudeDelta, longitudeDelta について。
latitudeDelta は対象マップ領域の北端と南端の緯度の差、
longitudeDelta は対象マップ領域の東端と西端の経度の差となる。
緯度の center の latitude から latitudeDelta / 2 北にずれれば表示範囲の北端が、南にずれれば表示範囲の南端が求まる。
経度についても同様。

  • MKMapViewDelegateデリゲートを使う準備
mapView.delegate = self
  • デリゲートメソッドmapView(_:rendererFor:)を実装して、MKPolygonオブジェクトを生成する。
    このデリゲートメソッドはMKMapView#addOverlayで追加された時に呼ばれる。
extension ViewController: MKMapViewDelegate {

    func mapView(_ mapView: MKMapView, rendererFor overlay: MKOverlay) -> MKOverlayRenderer {
        
        if let polygone = overlay as? MKPolygon {
            let renderer = MKPolygonRenderer(polygon: polygone)
            renderer.strokeColor = UIColor.red // 枠線の色
            renderer.fillColor = UIColor.red.withAlphaComponent(0.2) // 内側の色
            renderer.lineWidth = 2 // 枠線の太さ
            return renderer
        }
        
        return MKOverlayRenderer()
    }
}

MKMapView 上のタップした地点を中心にして円を描く

検証環境:
Xcode 12
Swift 5.3

f:id:xyk:20201110172554j:plain

地図上(MKMapView)に図形を描画するためにはMKOverlayプロトコルに適合したオブジェクトをMKMapView#addOverlayメソッドで追加する必要がある。

まずMapKitをインポートしておく。

import MapKit
  • MKMapView にUITapGestureRecognizerを追加してタップを検出する。
let tapGesture = UITapGestureRecognizer(target: self, action: #selector(mapTapped(_:)))
mapView.addGestureRecognizer(tapGesture)
  • この時呼び出すmapTappedメソッドを定義する。
    ここではタップ位置を中心としたMKCircleオブジェクトを作成してMKMapView#addOverlayで追加する。
@objc func mapTapped(_ sender: UITapGestureRecognizer) {
    if sender.state == .ended {
        let tapPoint = sender.location(in: mapView)
        // タップした座標(CGPoint)を緯度経度(CLLocationCoordinate2D)に変換する
        let center = mapView.convert(tapPoint, toCoordinateFrom: view)
        // 半径100m を指定
        let circle = MKCircle(center: center, radius: CLLocationDistance(100))
        mapView.addOverlay(circle)
    }
}
  • MKMapViewDelegateデリゲートを使う準備
mapView.delegate = self
  • デリゲートメソッドmapView(_:rendererFor:)を実装して、MKCircleRendererオブジェクトを生成する。
    このデリゲートメソッドはMKMapView#addOverlayで追加された時に呼ばれる。
extension ViewController: MKMapViewDelegate {

    func mapView(_ mapView: MKMapView, rendererFor overlay: MKOverlay) -> MKOverlayRenderer {
        
        if let circle = overlay as? MKCircle {
            let renderer = MKCircleRenderer(circle: circle)
            renderer.strokeColor = UIColor.red // 枠線の色
            renderer.fillColor = UIColor.red.withAlphaComponent(0.2) // 内側の色
            renderer.lineWidth = 2 // 枠線の太さ
            return renderer
        }
        
        return MKOverlayRenderer()
    }
}

Swift で UITextView のテキスト内のURLをリンク化する

検証環境:
Xcode 12
Swift 5.3

UITextView のテキスト内のURLをリンク化するには、isSelectableプロパティをtrue、そしてdataDetectorTypesプロパティに.linkを指定すればよい。
これでURL部分がリンク化され、リンクをタップすると Safari で開くようになる。

let textView = UITextView()
textView.text = "..."
textView.isEditable = false
textView.isSelectable = true
textView.dataDetectorTypes = [.link]

StoryBoard から設定する場合

f:id:xyk:20201104152854p:plain

表示例

f:id:xyk:20201104154843p:plain

http スキームがなくてもリンクとして検出された。


URL ではない任意の文字列をリンク化したい場合は以前書いたような UITextView のattributedTextlinkTextAttributesプロパティを設定してリンク化する方法がある。

xyk.hatenablog.com


ちなみに UILabel では UITextView と同じようなやり方はできず、自前で実装する必要がある。
同様の機能を実装した OSS が公開されているので、これらの使用を検討するとよいかも。

github.com

github.com

Swift で UILabel、UITextView の行間を広げる

検証環境:
Xcode 12
Swift 5.3

UILabel や UITextView で複数行のテキストを表示する場合、デフォルトでは行間がかなり狭い。
行の間隔を広げるには、UILabel、UITextView のどちらもattributedTextプロパティにNSAttributedString.KeyparagraphStyle属性を設定する。
以下がサンプルコード。ついでにテキストカラーも設定している。

UILabel

let label = UILabel()
let text = "..."

let paragraphStyle = NSMutableParagraphStyle()
paragraphStyle.lineSpacing = 8
let attributes: [NSAttributedString.Key: Any] = [
    .paragraphStyle: paragraphStyle,
    .foregroundColor: appPrimary
]
label.attributedText = NSAttributedString(
    string: text, attributes: attributes)

UITextView

let textView = UITextView()
let text = "..."

let paragraphStyle = NSMutableParagraphStyle()
paragraphStyle.lineSpacing = 8
let attributes: [NSAttributedString.Key: Any] = [
    .paragraphStyle: paragraphStyle,
    .foregroundColor: appPrimary
]
textView.attributedText = NSAttributedString(
    string: text, attributes: attributes)

Xcode で証明書を自動生成する方法

検証環境:
Xcode 12

証明書の期限が切れてたので新しい証明書を Xcode から自動生成した。
1年に一度しかやらず、やり方を忘れるのでメモしておく。

昔ながらの手順としては
- Keychain Access.app から Certificate Signing Request (CSR) を作成
- Apple Developer サイトに行ってCSR登録、証明書(.cer)作成
- 作成した証明書をダウンロードして Mac の Keychain にインストール
という微妙に面倒くさい手順が必要だが、Xcode から作成する場合、ボタンを一回ポチッとするだけですべてが完了する。

Xcode から証明書を作成する

先に期限切れの証明書は Mac の Keychain から削除、また Apple Developer サイト上から削除しておいた。
そして Xcode メニューの Preference -> Account -> Manage Certificates を開く。
+ ボタンを押し、今回は AppStore配布用の証明書なので、Apple Distribution を選択。
f:id:xyk:20201029170724p:plain

これだけで完了。
新しく作成された証明書が Mac の Keychain にインストールされ、Apple Developer にも登録される。

f:id:xyk:20201029171036p:plain

UITableViewCell の高さ変更時に制約エラー

検証環境:
Xcode 12
Swift 5.3
Deployment Target 11.0

UITableviewCell に vertical な UIStackView を配置して、セルタップ時にStackされているビューの isHidden プロパティを切り替えて、セルの高さを広げる処理をしたところ以下の制約エラーが発生した。

[LayoutConstraints] Unable to simultaneously satisfy constraints.
    Probably at least one of the constraints in the following list is one you don't want. 
    Try this: 
        (1) look at each constraint and try to figure out which you don't expect; 
        (2) find the code that added the unwanted constraint or constraints and fix it. 
(
    "<NSLayoutConstraint:0x2835e1680 V:[UIStackView:0x13bf20060]-(>=0)-|   (active, names: '|':UITableViewCellContentView:0x13bf228b0 )>",
    "<NSLayoutConstraint:0x2835e1720 V:|-(0)-[UIStackView:0x13bf20060]   (active, names: '|':UITableViewCellContentView:0x13bf228b0 )>",
    "<NSLayoutConstraint:0x2835ecb90 'UISV-canvas-connection' UIStackView:0x13bf20060.top == UIStackView:0x13bf201f0.top   (active)>",
    "<NSLayoutConstraint:0x283685180 'UISV-canvas-connection' V:[UIStackView:0x13bf2c220]-(0)-|   (active, names: '|':UIStackView:0x13bf20060 )>",
    "<NSLayoutConstraint:0x2835dc3c0 'UISV-canvas-connection' UIStackView:0x13bf2c220.top == UIStackView:0x1261ea210.top   (active)>",
    "<NSLayoutConstraint:0x2835dc960 'UISV-canvas-connection' V:[UIStackView:0x1093d6f70]-(0)-|   (active, names: '|':UIStackView:0x13bf2c220 )>",
    "<NSLayoutConstraint:0x2835dd590 'UISV-spacing' V:[UIStackView:0x1261431c0]-(16)-[UIStackView:0x1093d6f70]   (active)>",
    "<NSLayoutConstraint:0x283687840 'UISV-spacing' V:[UIStackView:0x13bf201f0]-(0)-[UIStackView:0x13bf2c220]   (active)>",
    "<NSLayoutConstraint:0x2835dcbe0 'UISV-spacing' V:[UIStackView:0x1261ea210]-(16)-[UIStackView:0x12611ebc0]   (active)>",
    "<NSLayoutConstraint:0x2835dc870 'UISV-spacing' V:[UIStackView:0x12611ebc0]-(16)-[UIStackView:0x1261c5c30]   (active)>",
    "<NSLayoutConstraint:0x2835dd310 'UISV-spacing' V:[UIStackView:0x1261c5c30]-(16)-[UIStackView:0x1261431c0]   (active)>",
    "<NSLayoutConstraint:0x2835ecfa0 'UIView-Encapsulated-Layout-Height' UITableViewCellContentView:0x13bf228b0.height == 60.5   (active)>"
)

Will attempt to recover by breaking constraint 
<NSLayoutConstraint:0x2835dd590 'UISV-spacing' V:[UIStackView:0x1261431c0]-(16)-[UIStackView:0x1093d6f70]   (active)>

セルの高さは tableView.rowHeight にUITableView.automaticDimension、tableView.estimatedRowHeight に 0 以外の値を設定することで、Self sizing 機能により自動で算出するようにしている。

tableView.rowHeight = UITableView.automaticDimension
tableView.estimatedRowHeight = 60

エラーメッセージに出ているUIView-Encapsulated-Layout-Heightというのはこの Self sizing によりシステムで自動で算出されて追加された高さの制約。

またセルタップ時の高さ変更には tableView.performBatchUpdates (iOS 11.0以降)を使い、その中で isHidden プロパティを変更している。

tableView.performBatchUpdates({
    // toggleメソッド内で isHidden プロパティの変更をしている
    (tableView.cellForRow(at: indexPath) as? MyTableViewCell)?.toggle()
}, completion: nil)

このエラーの対応としては、vertical な UIStackView の Bottom と、親ビュー contentView の bottom との関係をGreater Than or Equalで、priority 1000 の制約にしていたが、これを999にして優先度を下げることにより、制約がbreakingするエラーが出なくなった。

Swift で縦横の長さが違う UIImage を 90° 毎に回転させる

検証環境:
Xcode 12
Swift 5.3

今回は縦横の長さが違う画像を 90° 回転させた画像を作成する方法について。

f:id:xyk:20201013183740g:plain

表示上、回転するだけでよい場合は UIView の transform プロパティを使うと簡単にできる。

let radians = 90 * CGFloat.pi / 180
imageView.transform = imageView.transform.rotated(by: radians) // 90°回転

アニメーション付き

UIViewPropertyAnimator.runningPropertyAnimator(
    withDuration: 0.3, delay: 0.0, options: [.curveEaseOut]) {
        self.imageView.transform = self.imageView.transform.rotated(by: .pi / 2)
    } completion: { position in
        // do something
    }

そうではなくて、元の画像から 90° 毎回転させた画像を新たに作成したい場合には ImageContext に書き込んで作成する。

func rotateImage(_ image: UIImage, radians: CGFloat) -> UIImage {

    let rotatedSize = CGRect(origin: .zero, size: image.size)
        .applying(CGAffineTransform(rotationAngle: radians))
        .integral.size
    
    UIGraphicsBeginImageContextWithOptions(rotatedSize, false, image.scale)
    let context = UIGraphicsGetCurrentContext()!
    context.translateBy(x: rotatedSize.width / 2, y: rotatedSize.height / 2)
    context.rotate(by: radians)
    context.scaleBy(x: 1, y: -1)
    context.translateBy(x: -image.size.width / 2, y: -image.size.height / 2)
    context.draw(image.cgImage!, in: .init(origin: .zero, size: image.size))
    let newImage = UIGraphicsGetImageFromCurrentImageContext()!
    UIGraphicsEndImageContext()
    return newImage
}

UIImage の Extension にする場合

extension UIImage {
    
    func rotated(by radians: CGFloat) -> UIImage {

        let rotatedSize = CGRect(origin: .zero, size: size)
            .applying(CGAffineTransform(rotationAngle: radians))
            .integral.size

        UIGraphicsBeginImageContextWithOptions(rotatedSize, false, scale)
        if let context = UIGraphicsGetCurrentContext(), let cgImage = cgImage {
            context.translateBy(x: rotatedSize.width / 2, y: rotatedSize.height / 2)
            context.rotate(by: radians)
            context.scaleBy(x: 1, y: -1)
            context.translateBy(x: -size.width / 2, y: -size.height / 2)
            context.draw(cgImage, in: .init(origin: .zero, size: size))
            let rotatedImage = UIGraphicsGetImageFromCurrentImageContext()
            UIGraphicsEndImageContext()
            return rotatedImage ?? self
        }
        return self
    }
}

動作確認用のViewControllerサンプル。

class RotateViewController: UIViewController {
    
    override func viewDidLoad() {
        super.viewDidLoad()
        
        imageView1.contentMode = .scaleAspectFit
        imageView2.contentMode = .scaleAspectFit
        
        imageView1.image = UIImage(named: "coffee")!
    }

    var angle: CGFloat = 0
    
    func rotateImage(_ image: UIImage, clockwise: Bool) -> UIImage {
        var newAngle = clockwise ? angle + 90 : angle - 90
        if newAngle <= -360 || newAngle >= 360 {
            newAngle = 0
        }
        angle = newAngle
        
        let radians = angle * CGFloat.pi / 180
        
        let rotatedSize = CGRect(origin: .zero, size: image.size)
            .applying(CGAffineTransform(rotationAngle: radians))
            .integral.size
        
        UIGraphicsBeginImageContextWithOptions(rotatedSize, false, image.scale)
        let context = UIGraphicsGetCurrentContext()!
        context.translateBy(x: rotatedSize.width / 2, y: rotatedSize.height / 2)
        context.rotate(by: radians)
        context.scaleBy(x: 1, y: -1)
        context.translateBy(x: -image.size.width / 2, y: -image.size.height / 2)
        context.draw(image.cgImage!, in: .init(origin: .zero, size: image.size))
        let newImage = UIGraphicsGetImageFromCurrentImageContext()!
        UIGraphicsEndImageContext()
        return newImage
    }
    
    @IBOutlet weak var imageView1: UIImageView!
    @IBOutlet weak var imageView2: UIImageView!
    
    // 反時計回りに -90° 毎回転させる
    @IBAction func handleLeftButton(_ sender: UIButton) {
        let newImage = rotateImage(imageView1.image!, clockwise: false)
        imageView2.image = newImage
    }
    
    // 時計回りに 90° 毎回転させる
    @IBAction func handleRightButton(_ sender: UIButton) {
        let newImage = rotateImage(imageView1.image!, clockwise: true)
        imageView2.image = newImage
    }
}

参考:

Swift - UIImageをCoreGraphicsで回転させる - Qiita

Swift で UITextField の値の変更を検知する方法

検証環境:
Xcode 12
Swift 5.3

UIControl.Event.editingChanged を使う

let textField = UITextField(frame: .zero)

textField.addTarget(
    self, 
    action: #selector(textDidChange), 
    for: .editingChanged)
@objc func textDidChange(_ textField: UITextField) {
    print(textField.text)
}

UIAction を使う(iOS14以降)

iOS 14から UIControl のサブクラスで、UIAction をイニシャライザや addAction で追加できるようになった。

let textField = UITextField(frame: .zero)

textField.addAction(UIAction() { action in
    guard let text = (action.sender as? UITextField)?.text else { return }
    print(text)
}, for: .editingChanged)

NotificationCenter を使う

let textField = UITextField(frame: .zero)

NotificationCenter.default.addObserver(
    self,
    selector: #selector(textDidChange),
    name: UITextField.textDidChangeNotification,
    object: textField)
@objc func textDidChange(_ notification: Notification) {
    print(textField.text)
}

objectに textField インスタンスを指定することで、この textField の変更のみを検知できる。
objectnilを指定すると、すべての textField の変更を検知するようになる。

KVO(Key Value Observing) を使う

var observers = [NSKeyValueObservation]()
observers.append(textField.observe(\.text, options: [.old, .new]) { (textField, change) in
    guard let newValue = change.newValue else { return }
    print(newValue)
})

UITextFieldDelegate を使う

let textField = UITextField(frame: .zero)

textField.delegate = self
extension ViewController: UITextFieldDelegate {

    func textField(_ textField: UITextField, shouldChangeCharactersIn range: NSRange, replacementString string: String) -> Bool {
        let text = (textField.text as NSString?)?.replacingCharacters(in: range, with: string)
        print(text)
        return true
    }
}

CircleCI で SSH fingerprint が原因で xcodebuild エラー

CircleCI で iOS アプリをxcode: "12.0.0"でビルド中に以下のエラーが出た。
SSH fingerprint が原因でパッケージの依存関係の解決に失敗している。

xcodebuild: error: Could not resolve package dependencies:
  The server SSH fingerprint failed to verify.

discuss.bitrise.io

こちらによるとXcode11からの既知の問題らしい。

またCircleCIのサポートページに解決方法が書いてあった。

support.circleci.com

こちらを参考に config.yml の checkout の後に以下コマンドを追加したところエラーはでなくなった。

- run: sudo defaults write com.apple.dt.Xcode IDEPackageSupportUseBuiltinSCM YES
- run: rm ~/.ssh/id_rsa || true
- run: for ip in $(dig @8.8.8.8 bitbucket.org +short); do ssh-keyscan bitbucket.org,$ip; ssh-keyscan $ip; done 2>/dev/null >> ~/.ssh/known_hosts || true 
- run: for ip in $(dig @8.8.8.8 github.com +short); do ssh-keyscan github.com,$ip; ssh-keyscan $ip; done 2>/dev/null >> ~/.ssh/known_hosts || true

Xcode にキーボードショートカットを追加する

検証環境:
Xcode 12
Swift 5.3

  • Finder を開き、「Command(⌘) + Shift(⇧) + G」を押す。
  • /Applications/Xcode.app/Contents/Frameworks/IDEKit.framework/Versions/A/Resources/ を入力してディレクトリを開く。
  • IDETextKeyBindingSet.plist ファイルをエディタで開く。
    またはターミナルから開く場合。
vi /Applications/Xcode.app/Contents/Frameworks/IDEKit.framework/Versions/A/Resources/IDETextKeyBindingSet.plist
  • 最後の2行の上に追加する。今回は3つのコマンドを追加した。
    • 現在のカーソル行の複製
    • 現在のカーソル行の削除
    • 行末でなくても改行
    <key>My Custom Commands</key>
    <dict>
        <key>Duplicate Current Line</key>
        <string>selectLine:, copy:, moveToBeginningOfLine:, paste:, moveToEndOfLine:</string>

        <key>Delete Current Line</key>
        <string>selectLine:, delete:</string>

        <key>Continue Newline</key>
        <string>moveToEndOfLine:, insertNewline:</string>
    </dict>

</dict>
</plist>
  • Xcode を再起動する。
    「Command(⌘) + ,」で Preferences を開き、さらに Key Bindings を開く。

コマンドが追加されているので、右側の方をクリックし、実際のショートカットコマンドを入力する。

今回は以下のようなショートカットを登録した。

  • Delete Current Line(現在のカーソル行の削除)-> Command(⌘) + D
  • Continue Newline(行末でなくても改行)-> Shift(⇧) + enter(↩)
  • Duplicate Current Line(現在のカーソル行の複製)-> Shift(⇧) + Command(⌘) + V

既存のショートカットを被ると赤バツが表示される。

その場合は Conflicts タブを開き、既存のショートカットを見つけて、マイナスボタンを押してショートカットを削除する。
削除できないものもあるのでその場合は適当に他のショートカットを割り当てるなどする。

ここで追加したショートカットは

~/Library/Developer/Xcode/UserData/KeyBindings/ディレクトリにある
Default.idekeybindingsファイルに追記されている。

ちなみに Xcode をアップデートすると IDETextKeyBindingSet.plist がリセットされるので、再度追加する必要がある。