環境: Swift3
UIViewの角を丸くした枠線を書くには以下のように書けばよい。
let roundView = UIView()
roundView.backgroundColor = .lightGray
roundView.layer.borderColor = UIColor.blue.cgColor
roundView.layer.borderWidth = 3
roundView.layer.cornerRadius = 10
roundView.layer.masksToBounds = true
// roundView.clipsToBounds = true // masksToBounds と同じ
さらに枠線を破線にしたいのでCAShapeLayerを使って以下のように実装した。
以下がプレイグラウンドで確認した完成画像となる。

import UIKit
import PlaygroundSupport

final class DashedBorderAroundView: UIView {

    override func layoutSublayers(of layer: CALayer) {
        super.layoutSublayers(of: layer)

        if self.dashedBorderLayer.superlayer == nil {
            self.layer.addSublayer(self.dashedBorderLayer)
            // self.layer.insertSublayer(self.dashedBorderLayer, at: 0)
            self.layer.cornerRadius = 10
        }
    }

    private lazy var dashedBorderLayer: CAShapeLayer = { [unowned self] in

        let rect = self.bounds
        let cornerRadius: CGFloat = 10

        let path = UIBezierPath()

        path.move(to: CGPoint(x: 0, y: rect.maxY - cornerRadius)) // 1
        path.addLine(to: CGPoint(x: 0, y: cornerRadius)) // 2
        path.addArc(withCenter: CGPoint(x: cornerRadius, y: cornerRadius), // 3
                    radius: cornerRadius,
                    startAngle: CGFloat(M_PI),
                    endAngle: -CGFloat(M_PI_2),
                    clockwise: true)
        path.addLine(to: CGPoint(x: rect.maxX - cornerRadius, y: 0)) // 4
        path.addArc(withCenter: CGPoint(x: rect.maxX - cornerRadius, y: cornerRadius), // 5
                    radius: cornerRadius,
                    startAngle: -CGFloat(M_PI_2),
                    endAngle: 0,
                    clockwise: true)
        path.addLine(to: CGPoint(x: rect.maxX, y: rect.maxY - cornerRadius)) // 6
        path.addArc(withCenter: CGPoint(x: rect.maxX - cornerRadius, y: rect.maxY - cornerRadius), // 7
                    radius: cornerRadius,
                    startAngle: 0,
                    endAngle: CGFloat(M_PI_2),
                    clockwise: true)
        path.addLine(to: CGPoint(x: cornerRadius, y: rect.maxY)) // 8
        path.addArc(withCenter: CGPoint(x: cornerRadius, y: rect.maxY - cornerRadius), // 9
                    radius: cornerRadius,
                    startAngle: CGFloat(M_PI_2),
                    endAngle: CGFloat(M_PI),
                    clockwise: true)

        let shapeLayer = CAShapeLayer()
        shapeLayer.fillColor = UIColor.clear.cgColor
        shapeLayer.strokeColor = UIColor.blue.cgColor
        shapeLayer.lineWidth = 3
        shapeLayer.lineDashPattern = [3, 6]
        shapeLayer.lineCap = kCALineJoinRound
        shapeLayer.path = path.cgPath

        return shapeLayer
    }()

}

let view = UIView(frame: CGRect(x: 0, y: 0, width: 200, height: 200))
view.backgroundColor = .white

let dView = DashedBorderAroundView(frame: CGRect(x: 0, y: 0, width: 100, height: 100))
dView.backgroundColor = .lightGray
dView.center = view.center
view.addSubview(dView)

PlaygroundPage.current.liveView = view
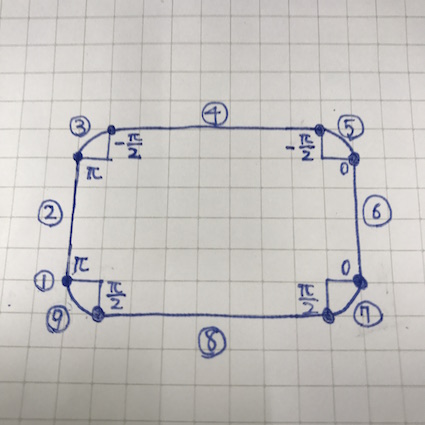
パスの描画部分がわかりづらいので図で補足説明を追加。
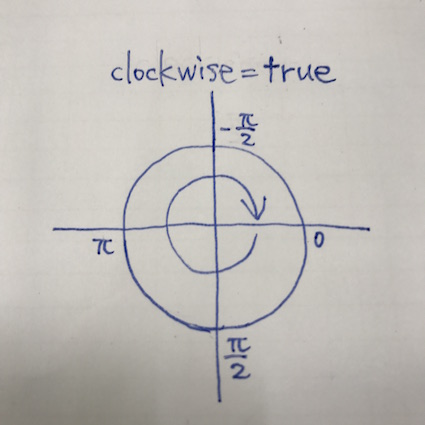
回転方向
パスの順番