UIPickerView をキーボードのように表示・非表示させる
環境:iOS Deployment Target 7.1
やりたいこと:
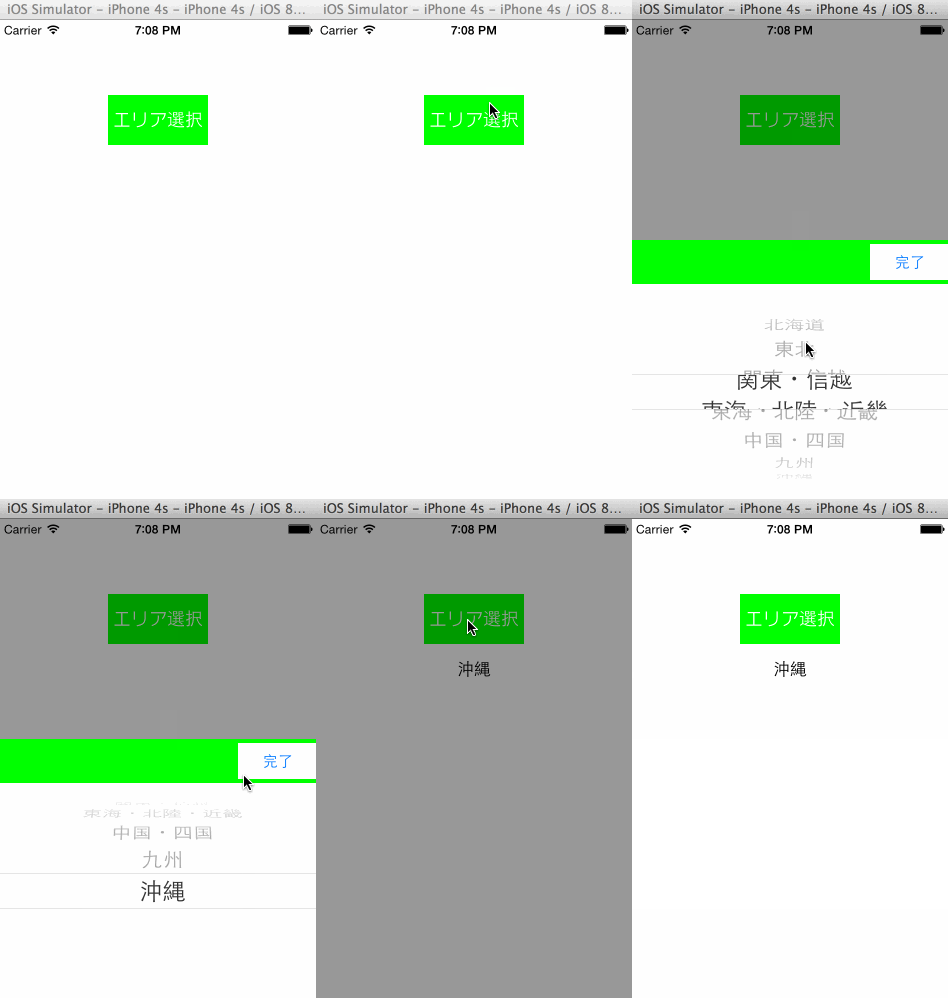
ボタンタップ時にキーボードが下からシュッと出てくるようにピッカーを表示させたい。
完了ボタンのタップで決定、ピッカー以外の部分をタップした時にはピッカーを隠す。
こんなかんじ。

やってること
ピッカー呼び出しボタンタップ時
- キャンセル用のビューを画面全体に被せる。ターゲット/アクションデザインパターンを使ってターゲットとアクションを設定している
- 画面外に作成していたピッカーと完了ボタンをアニメーションで画面内に移動させ表示
を行う。
完了ボタンのタップで選択中ピッカーを取得してピッカーを隠す。
ピッカー外のキャンセルビューをタップでピッカーを隠す。
サンプルコード
OverlayView.h
#import <UIKit/UIKit.h>

@interface OverlayView : UIView
@property(nonatomic, weak) id target;
@property(nonatomic, assign) SEL action;
@end
OverlayView.m
#import "OverlayView.h"

@implementation OverlayView

- (void)touchesBegan:(NSSet *)touches withEvent:(UIEvent *)event
{
    [self.target performSelector:self.action withObject:self afterDelay:0.0f];
}

@end
PickerViewController.h
#import <UIKit/UIKit.h>

@interface PickerViewController : UIViewController
@end
PickerViewController.m
#import "PickerViewController.h"
#import "OverlayView.h"

@interface PickerViewController ()
<
UIPickerViewDelegate,
UIPickerViewDataSource
>

@property(nonatomic, strong) UIView *areaView;
@property(nonatomic, strong) UIPickerView *areaPickerView;
@property(nonatomic, strong) OverlayView *overlayView;

@property(nonatomic, strong) NSArray *areaList;
@property(nonatomic, strong) UILabel *areaLabel;

@end

@implementation PickerViewController

- (void)viewDidLoad
{
    [super viewDidLoad];

    self.areaList = @[
                      @[@"1", @"北海道"],
                      @[@"2", @"東北"],
                      @[@"3", @"関東・信越"],
                      @[@"4", @"東海・北陸・近畿"],
                      @[@"5", @"中国・四国"],
                      @[@"6", @"九州"],
                      @[@"7", @"沖縄"],
                      ];

    // ピッカー呼び出しボタン作成
    UIButton *button = [[UIButton alloc] initWithFrame:CGRectMake(0, 0, 100, 50)];
    button.center = CGPointMake(self.view.bounds.size.width / 2, 100);
    button.backgroundColor = [UIColor greenColor];
    [button setTitle:@"エリア選択" forState:UIControlStateNormal];
    [button addTarget:self action:@selector(showAreaView:) forControlEvents:UIControlEventTouchUpInside];
    [self.view addSubview:button];

    // エリア表示用ラベルの作成
    self.areaLabel = [[UILabel alloc] initWithFrame:CGRectMake(0, 0, 150, 50)];
    self.areaLabel.center = CGPointMake(self.view.bounds.size.width / 2, 150);
    self.areaLabel.textAlignment = NSTextAlignmentCenter;
    [self.view addSubview:self.areaLabel];

    // キャンセル用ビューの作成
    self.overlayView = [[OverlayView alloc] initWithFrame:CGRectZero];
    self.overlayView.target = self;
    self.overlayView.action = @selector(hideAreaView);
    self.overlayView.backgroundColor = [UIColor blackColor];
    self.overlayView.alpha = 0.4;
    [self.view addSubview:self.overlayView];

    // エリア選択ピッカーの作成
    [self buildAreaPickerView];
}

- (void)showAreaView:(UIButton*)button
{
    [self.view bringSubviewToFront:_overlayView]; // 最前面に移動
    [self.view bringSubviewToFront:_areaView]; // 最前面に移動
    self.overlayView.frame = [[UIScreen mainScreen] bounds];
    [UIView animateWithDuration:.20 animations:^{
        self.areaView.transform = CGAffineTransformMakeTranslation(0, -(AREA_PICKER_ACCESSORY_HEIGHT + AREA_PICKER_HEIGHT));
    }];
}

- (void)hideAreaView
{
    [UIView animateWithDuration:.20 animations:^{
        self.areaView.transform = CGAffineTransformIdentity;
    }];
    self.overlayView.frame = CGRectZero;
}

static const float AREA_PICKER_ACCESSORY_HEIGHT = 44;
static const float AREA_PICKER_HEIGHT = 216;

- (void)buildAreaPickerView
{
    float height = self.view.bounds.size.height;
    float width = self.view.bounds.size.width;

    // 1. アクセサリビューとピッカービューを乗せるビューの作成
    float areaViewHeight = AREA_PICKER_ACCESSORY_HEIGHT + AREA_PICKER_HEIGHT;
    self.areaView = [[UIView alloc] initWithFrame:CGRectMake(0,
                                                             height,
                                                             width,
                                                             areaViewHeight)];
    [self.view addSubview:self.areaView];

    // 2-1. アクセサリビュー作成
    UIView *areaPickerAccessoryView =
        [[UIView alloc] initWithFrame:CGRectMake(0,
                                                 0,
                                                 width,
                                                 AREA_PICKER_ACCESSORY_HEIGHT)];
    areaPickerAccessoryView.backgroundColor = [UIColor greenColor];

    // 2-2. 決定ボタン作成
    const float DONE_BUTTON_WEDTH = 80;
    UIButton *doneBtn = [UIButton buttonWithType:UIButtonTypeRoundedRect];
    doneBtn.frame = CGRectMake(width - DONE_BUTTON_WEDTH,
                               4,
                               DONE_BUTTON_WEDTH,
                               36);
    doneBtn.backgroundColor = [UIColor whiteColor];
    [doneBtn setTitle:@"完了" forState:UIControlStateNormal];
    [doneBtn addTarget:self
                action:@selector(performAreaDoneButtonAction)
      forControlEvents:UIControlEventTouchUpInside];
    [areaPickerAccessoryView addSubview:doneBtn];
    [self.areaView addSubview:areaPickerAccessoryView];

    // 3. ピッカー作成
    self.areaPickerView =
        [[UIPickerView alloc] initWithFrame:CGRectMake(0,
                                                       AREA_PICKER_ACCESSORY_HEIGHT,
                                                       width,
                                                       AREA_PICKER_HEIGHT)];
    self.areaPickerView.backgroundColor = [UIColor whiteColor];
    self.areaPickerView.delegate = self;
    self.areaPickerView.dataSource = self;
    [self.areaPickerView selectRow:2 inComponent:0 animated:NO]; // 初期値設定
    [self.areaView addSubview:self.areaPickerView];
}

- (void)performAreaDoneButtonAction
{
    NSInteger row = [self.areaPickerView selectedRowInComponent:0];
    NSLog(@"areaCode:%@, areaName:%@", self.areaList[row][0], self.areaList[row][1]);
    self.areaLabel.text = self.areaList[row][1];
    [self hideAreaView];
}

// UIPickerViewDataSource, UIPickerViewDelegate delegate
- (NSInteger)numberOfComponentsInPickerView:(UIPickerView *)pickerView
{
    return 1;
}

- (NSInteger)pickerView:(UIPickerView *)pickerView numberOfRowsInComponent:(NSInteger)component
{
    return self.areaList.count;
}

- (NSString *)pickerView:(UIPickerView *)pickerView titleForRow:(NSInteger)row forComponent:(NSInteger)component
{
    return self.areaList[row][1];
}

@end
※追記
もっと簡単なやり方を書いた。
UITextField の inputView に UIPickerView を設定する
UITableView の`scrollToRowAtIndexPath:atScrollPosition:animated:`でエラー
環境:iOS Deployment Target 7.1
UITableView でスクロール位置を画面上部に戻そうとしてscrollToRowAtIndexPath:atScrollPosition:animated:メソッドを使っていたのだが、レコード0件時にエラーが発生した。
コード
    NSIndexPath *indexPath = [NSIndexPath indexPathForRow:0 inSection:0];
    [self.tableView scrollToRowAtIndexPath:indexPath atScrollPosition:UITableViewScrollPositionTop animated:NO];
エラー内容
*** Terminating app due to uncaught exception 'NSRangeException', reason: '-[UITableView _contentOffsetForScrollingToRowAtIndexPath:atScrollPosition:]: row (0) beyond bounds (0) for section (0).'
レコードがあるときだけ実行するように修正
if ([self.tableView numberOfRowsInSection:0] > 0) {
    NSIndexPath *indexPath = [NSIndexPath indexPathForRow:0 inSection:0];
    [self.tableView scrollToRowAtIndexPath:indexPath atScrollPosition:UITableViewScrollPositionTop animated:NO];
}
UITextField, UITextView がキーボードで隠れないようにする
環境:iOS Deployment Target 7.1
UITextField、UITextView は入力フィールドにフォーカスが当たると画面下からキーボードが現れるが、この時に入力フィールドが画面下側にある場合にキーボードの裏に隠れてしまう問題がある。
※ 追記
Swift 版はこちら。
やりたいこと
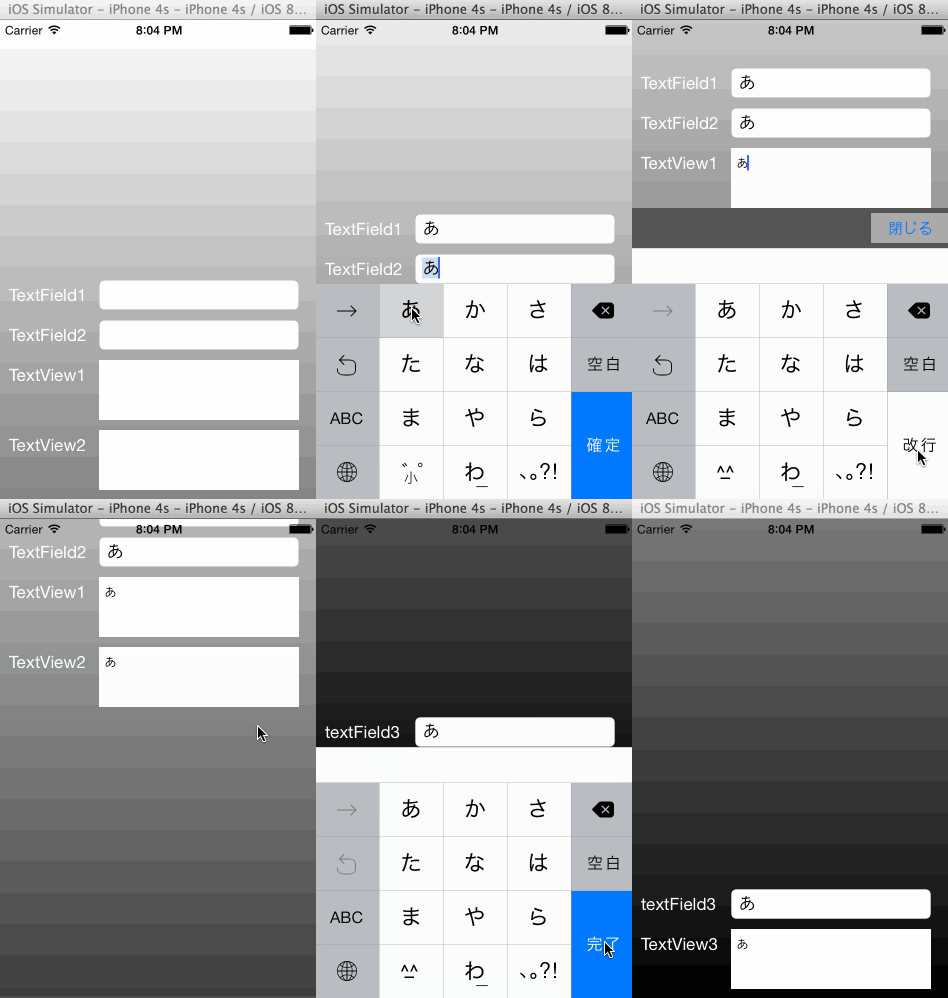
1画面に複数の UITextField と 複数の UITextView があった場合でも入力フィールドがキーボードに隠れないようにしたい。
対応方法
UITextField や UITextView をスクロールビューに乗せる。そしてキーボードの上げ下げに合わせてスクロールビューをスクロールさせる(+余白の追加)というやり方でできた。
流れ
UIScrollView を作成
その上に UITextField, UITextView を配置
viewWillAppear でキーボード表示前のイベント
UIKeyboardWillShowNotificationとキーボード非表示前のイベントUIKeyboardWillHideNotificationを登録入力フィールドにフォーカスが当たりキーボード表示時
UIKeyboardWillShowNotificationに対象の入力フィールドの bottom とキーボードの top を比較してキーボードの裏に隠れるようだったら以下の処理を行うキーボードが入力フィールドに被る分の高さを算出し、その高さ分を UIScrollView の contentInset と scrollIndicatorInsets の bottom にセットして余白スペースを追加する
UIScrollView の contentOffset にも高さ分をセットしてスクロールで移動させる
キーボード非表示時
UIKeyboardWillHideNotificationには contentInset と scrollIndicatorInsets の bottom に 0 をセットする。もしインセット部分が画面表示内に含まれていたら、戻りの contentOffset を設定せずとも自動的に削除分、上にスクロールしてくれるviewWillDisappear で登録していたキーボード表示・非表示時の Notification を削除
サンプル画面
青い枠が実際に表示されている範囲。

動作画面

サンプルコード
#import "ViewController.h"

@interface ViewController ()
<
UIScrollViewDelegate,
UITextFieldDelegate,
UITextViewDelegate
>
@end

@implementation ViewController
{
    UIScrollView *_scrollView;
    UITextField *_activeField;
    UITextView *_activeTextView;
}

- (void)viewDidLoad
{
    [super viewDidLoad];

    // スクロールできる縦長の画面を UIScrollView で作成する
    _scrollView = [[UIScrollView alloc] initWithFrame:self.view.bounds];
    _scrollView.backgroundColor = [UIColor lightGrayColor];
    [_scrollView setContentSize: CGSizeMake(_scrollView.bounds.size.width, 1000)];

    // スクロールがわかりやすいように背景色をグラデーションにする
    CAGradientLayer *gLayer = [CAGradientLayer layer];
    gLayer.frame = CGRectMake(_scrollView.bounds.origin.x,
                              _scrollView.bounds.origin.y,
                              _scrollView.contentSize.width,
                              _scrollView.contentSize.height);
    gLayer.colors = @[(id)[UIColor whiteColor].CGColor, (id)[UIColor blackColor].CGColor];
    [_scrollView.layer insertSublayer:gLayer atIndex:0];

    [self.view addSubview:_scrollView];

    // UITextField, UITextView を配置
    [_scrollView addSubview:[self createLabel:CGRectMake(10, 260, 80, 30) labelText:@"TextField1"]];
    [_scrollView addSubview:[self createTextField:CGRectMake(100, 260, 200, 30)]];

    [_scrollView addSubview:[self createLabel:CGRectMake(10, 300, 80, 30) labelText:@"TextField2"]];
    [_scrollView addSubview:[self createTextField:CGRectMake(100, 300, 200, 30)]];

    [_scrollView addSubview:[self createLabel:CGRectMake(10, 340, 80, 30) labelText:@"TextView1"]];
    [_scrollView addSubview:[self createTextView:CGRectMake(100, 340, 200, 60)]];

    [_scrollView addSubview:[self createLabel:CGRectMake(10, 410, 80, 30) labelText:@"TextView2"]];
    [_scrollView addSubview:[self createTextView:CGRectMake(100, 410, 200, 60)]];

    [_scrollView addSubview:[self createLabel:CGRectMake(10, 890, 80, 30) labelText:@"textField3"]];
    [_scrollView addSubview:[self createTextField:CGRectMake(100, 890, 200, 30)]];

    [_scrollView addSubview:[self createLabel:CGRectMake(10, 930, 80, 30) labelText:@"TextView3"]];
    [_scrollView addSubview:[self createTextView:CGRectMake(100, 930, 200, 60)]];
}

// UITextField の Return キーをタップ時にキーボードを隠す
- (BOOL)textFieldShouldReturn:(UITextField *)textField
{
    [textField resignFirstResponder];
    return YES;
}

// UITextView のキーボードを隠す
- (void)closeKeyboardForTextView
{
    [_activeTextView resignFirstResponder];
}

- (void)viewWillAppear:(BOOL)animated
{
    [super viewWillAppear:animated];

    // キーボード表示・非表示時のイベント登録
    [[NSNotificationCenter defaultCenter] addObserver:self
                                             selector:@selector(keyboardWillShown:)
                                                 name:UIKeyboardWillShowNotification object:nil];

    [[NSNotificationCenter defaultCenter] addObserver:self
                                             selector:@selector(keyboardWillHidden:)
                                                 name:UIKeyboardWillHideNotification object:nil];
}

- (void)viewWillDisappear:(BOOL)animated
{
    // キーボード表示・非表示時のイベント削除
    [[NSNotificationCenter defaultCenter] removeObserver:self name:UIKeyboardWillShowNotification object:nil];
    [[NSNotificationCenter defaultCenter] removeObserver:self name:UIKeyboardWillHideNotification object:nil];
}

- (void)keyboardWillShown:(NSNotification *)notification
{
    // キーボードの top を取得する
    NSDictionary *userInfo = [notification userInfo];
    CGRect keyboardRect = [[userInfo objectForKey:UIKeyboardFrameEndUserInfoKey] CGRectValue];
    keyboardRect = [_scrollView convertRect:keyboardRect fromView:nil]; // 座標変換。お約束らしいがよくわかっていない。。

    CGRect textFieldRect;
    if (_activeTextView != nil) {
        textFieldRect = _activeTextView.frame;
    }
    if (_activeField != nil) {
        textFieldRect = _activeField.frame;
    }

    // キーボードに隠れない場合は何もしない
    if (CGRectGetMaxY(textFieldRect) < CGRectGetMinY(keyboardRect)) {
        return;
    }

    CGFloat nowOffsetY = _scrollView.contentOffset.y;

    // スクロールさせる距離を算出
    CGFloat offsetY = CGRectGetMaxY(textFieldRect) - CGRectGetMinY(keyboardRect);

    // scrollView の contentInset と scrollIndicatorInsets の bottom に追加
    UIEdgeInsets contentInsets = UIEdgeInsetsMake(0.0, 0.0, offsetY, 0.0);
    _scrollView.contentInset = contentInsets;
    _scrollView.scrollIndicatorInsets = contentInsets;

    // 移動後のオフセット算出
    CGPoint scrollPoint = CGPointMake(0.0, nowOffsetY + offsetY);

    // キーボードアニメーションと同じ間隔、速度になるように設定
    [UIView beginAnimations:nil context:NULL];
    [UIView setAnimationDuration:[notification.userInfo[UIKeyboardAnimationDurationUserInfoKey] doubleValue]];
    [UIView setAnimationCurve:[notification.userInfo[UIKeyboardAnimationCurveUserInfoKey] integerValue]];
    [UIView setAnimationBeginsFromCurrentState:YES];

    // 移動後のオフセット設定
    _scrollView.contentOffset = scrollPoint;

    // 表示アニメーション開始
    [UIView commitAnimations];
}

- (void)keyboardWillHidden:(NSNotification *)notification
{
    // キーボードアニメーションと同じ間隔、速度になるように設定
    [UIView beginAnimations:nil context:NULL];
    [UIView setAnimationDuration:[notification.userInfo[UIKeyboardAnimationDurationUserInfoKey] doubleValue]];
    [UIView setAnimationCurve:[notification.userInfo[UIKeyboardAnimationCurveUserInfoKey] integerValue]];
    [UIView setAnimationBeginsFromCurrentState:YES];

    // インセットを 0 にする
    UIEdgeInsets contentInsets = UIEdgeInsetsZero;
    _scrollView.contentInset = contentInsets;
    _scrollView.scrollIndicatorInsets = contentInsets;

    // 非表示アニメーション開始
    [UIView commitAnimations];
}

// UITextField にフォーカスが当たった時
- (void)textFieldDidBeginEditing:(UITextField *)textField
{
    _activeField = textField;
}

// UITextField のフォーカスが外れた時
- (void)textFieldDidEndEditing:(UITextField *)textField
{
    if (textField == _activeField) {
        _activeField = nil;
    }
}

// UITextView にフォーカスが当たった時
- (BOOL)textViewShouldBeginEditing:(UITextView *)textView
{
    _activeTextView = textView;
    return YES;
}

// UITextView のフォーカスが外れた時
- (BOOL)textViewShouldEndEditing:(UITextView *)textView
{
    if (textView == _activeTextView) {
        _activeTextView = nil;
    }
    return YES;
}

// 入力フィールドのラベル作成
- (UILabel *)createLabel:(CGRect)frame labelText:(NSString *)text
{
    UILabel *label = [[UILabel alloc] init];
    label.frame = frame;
    label.backgroundColor = [UIColor clearColor];
    label.textColor = [UIColor whiteColor];
    label.text = text;
    return label;
}

// UITextField 作成
- (UITextField *)createTextField:(CGRect)frame
{
    UITextField* textField = [[UITextField alloc] initWithFrame:frame];
    textField.borderStyle = UITextBorderStyleRoundedRect;
    textField.returnKeyType = UIReturnKeyDone;
    textField.delegate = self;
    return textField;
}

// UITextView 作成
- (UITextView *)createTextView:(CGRect)frame
{
    UITextView *textView = [[UITextView alloc] initWithFrame:frame];
    textView.delegate = self;
    textView.inputAccessoryView = [self createAccessoryView];
    return textView;
}

// 閉じるボタンを配置したアクセサリビュー作成
- (UIView *)createAccessoryView
{
    UIView *accessoryView = [[UIView alloc] initWithFrame:CGRectMake(0, 0, self.view.bounds.size.width, 40)];
    accessoryView.backgroundColor = [UIColor darkGrayColor];
    UIButton *closeBtn = [UIButton buttonWithType:UIButtonTypeRoundedRect];
    closeBtn.backgroundColor = [UIColor lightGrayColor];
    closeBtn.frame = CGRectMake(self.view.bounds.size.width - 80, 5, 80, 30);
    [closeBtn setTitle:@"閉じる" forState:UIControlStateNormal];
    [closeBtn addTarget:self action:@selector(closeKeyboardForTextView) forControlEvents:UIControlEventTouchUpInside];
    [accessoryView addSubview:closeBtn];
    return accessoryView;
}

@end
UIScrollView の contentInset と scrollIndicatorInsets について
図で見るとわかりやすい。


ただし、contentInsetの値を変更すると、ScrollViewがスクロールインジケータを表示する場合に予 期せぬ副次的な影響があります。ユーザが画面の最上部または最下部へコンテンツをドラッグする と、スクロールインジケータが、contentInsetで定義された領域内の領域に表示されているすべて のコンテンツ(たとえば、ナビゲーションコントロールやツールバーなど)に重ねてスクロールして しまいます。 これを修正するには、scrollIndicatorInsetsプロパティを設定する必要があります。contentInset プロパティと同様に、scrollIndicatorInsetsプロパティはUIEdgeInsets構造体として定義されて います。垂直インセット値を設定すると、垂直スクロールのインジケータがそのインセット値を超え て表示されるのを制限します。またこれにより、水平スクロールのインジケータがcontentInsetの 矩形領域の外側に表示されるようになります。 scrollIndicatorInsetsプロパティも設定せずにcontentInsetを変更すると、スクロールインジ ケータがNavigation Controllerおよびツールバーに重ねて描画され、望まない結果となります。しか し、scrollIndicatorInsetsの各値をcontentInsetの値に一致するように設定すると、この状況は 解消されます。 https://developer.apple.com/jp/devcenter/ios/library/documentation/UIScrollView_pg.pdf
その他
変換候補表示時もキーボード系の Notification が通知される。スクロール位置を調整する時にこの高さ分も事前に含んでおいた方が余計なスクロールをせずにすむ。上のサンプルでは含んでないけど。
UIKeyboardWillShowNotification はキーボード表示前、 UIKeyboardDidShowNotification はキーボード表示後でタイミングが違うので注意。はじめは気付かずにDidの方を使っていてキーボードの表示からワンテンポ遅れてスクロールしてた。
- UIKeyboardWillHideNotification
- UIKeyboardDidHideNotification
- UIKeyboardWillShowNotification
- UIKeyboardDidShowNotification
ナビゲーションバーを使う場合を考慮していない。インセットに UIEdgeInsetsZero を設定するのはマズい。
追記
hackiftekhar/IQKeyboardManager
https://github.com/hackiftekhar/IQKeyboardManager
ライブラリを見つけたのでメモ。
デモをちょっと試したけど UITextField、UITextView の使い方をすべて網羅しているかんじ。swift 対応もしてる。