xyk blog

最近は iOS 開発の記事が多めです。

iOS14 での CLLocationManager の変更点

検証環境:
Xcode 12.4
Swift 5.3.2
iOS Deployment Target 14.4

f:id:xyk:20210409193347p:plain

iOS で位置情報を取得するにはCLLocationManagerを使用するのだが、iOS14から使い方が少し変更になったのでメモ。

1つ目がアプリが位置情報サービスの使用するための承認ステータスauthorizationStatusが、以前はクラスメソッドの CLLocationManager.authorizationStatus()
を使って取得していたがこれが Deprecated になり、iOS14からは CLLocationManager のプロパティ
locationManager.authorizationStatus
に変更された。

2つ目が承認ステータスに変更があった時に呼び出される CLLocationManager のデリゲートメソッド
func locationManager(_ manager: CLLocationManager, didChangeAuthorization status: CLAuthorizationStatus)
を使っていたがこれが Deprecated になり、iOS14からは
func locationManagerDidChangeAuthorization(_ manager: CLLocationManager)
を使うことになった。

iOS14 で現在位置を取得する簡単なサンプルコード

import UIKit
import CoreLocation

class ViewController: UIViewController {
    
    let locationManager = CLLocationManager()
    
    override func viewDidLoad() {
        super.viewDidLoad()
        
        locationManager.delegate = self
        
        if CLLocationManager.locationServicesEnabled() {
            locationManager.requestWhenInUseAuthorization() // 位置情報サービスを使用するために許可を要求する
        } else {
            print("位置情報の使用を許可してください")
        }
    }
}

extension ViewController: CLLocationManagerDelegate {
    
    // ↓iOS14から追加された新しいデリゲートメソッド
    func locationManagerDidChangeAuthorization(_ manager: CLLocationManager) {
    
        // ↓iOS14から追加された新しいプロパティ   
        switch manager.authorizationStatus {
        case .notDetermined: // 初回呼び出し時、設定で次回確認を選択時
            print("notDetermined")
            break
        case .restricted: // ペアレンタルコントロールなどの制限あり
            print("restricted")
            break
        case .denied: // 使用拒否した
            print("denied")
            break
        case .authorizedAlways: // いつでも位置情報サービスを開始することを許可した
            print("authorizedAlways")
            manager.startUpdatingLocation() // 位置情報の取得開始
            break
        case .authorizedWhenInUse: // アプリ使用中のみ位置情報サービスを開始することを許可した
            print("authorizedWhenInUse")
            manager.startUpdatingLocation() // 位置情報の取得開始
        @unknown default:
            break
        }
        
        // iOS14から追加された位置情報精度
        switch manager.accuracyAuthorization {
        case .fullAccuracy: // 正確な位置情報
            print("fullAccuracy")
            break
        case .reducedAccuracy: // おおよその位置情報
            print("reducedAccuracy")
            break
        @unknown default:
            break
        }
    }
    
    func locationManager(_ manager: CLLocationManager, didUpdateLocations locations: [CLLocation]) {
        print("didUpdateLocations: \(locations)") //  位置情報の取得成功
        manager.stopUpdatingLocation() // 位置情報の収集終了
    }
    
    func locationManager(_ manager: CLLocationManager, didFailWithError error: Error) {
        print("didFailWithError: \(error)") //  位置情報の取得失敗
    }
}

Info.plist に

  • Privacy - Location When In Use Usage Description
    NSLocationWhenInUseUsageDescription

または

  • Privacy - Location Always and When In Use Usage Description
    NSLocationAlwaysAndWhenInUseUsageDescription

の追加も忘れずに。

MKAnnotation ピンの画像をカスタマイズする

検証環境:
Xcode 12.4
Swift 5.3.2
iOS Deployment Target 14.4

マップ(MKMapView)上のピンの画像をデフォルトのものではなく別の画像にカスタマイズする方法について。

iOS11からマップビューにデフォルトでMKMarkerAnnotationViewが登録されているので、mapView.dequeueReusableAnnotationViewで取得し、glyphImageプロパティに画像を設定すればよい。
画像は iOS13 から追加された SF Symbols の画像を使って置き換えた。
またピンの色はmarkerTintColorを設定することで変更できる。

f:id:xyk:20210408132137p:plain

コードは前回のサンプルコードに追記していく形で。
xyk.hatenablog.com

サンプルコード

import UIKit
import MapKit

class ViewController: UIViewController {

    let mapView = MKMapView()
    
    override func viewDidLoad() {
        super.viewDidLoad()
        
        view.addSubview(mapView)
        mapView.translatesAutoresizingMaskIntoConstraints = false
        NSLayoutConstraint.activate([
            mapView.topAnchor.constraint(equalTo: view.safeAreaLayoutGuide.topAnchor),
            mapView.bottomAnchor.constraint(equalTo: view.safeAreaLayoutGuide.bottomAnchor),
            mapView.leftAnchor.constraint(equalTo: view.safeAreaLayoutGuide.leftAnchor),
            mapView.rightAnchor.constraint(equalTo: view.safeAreaLayoutGuide.rightAnchor),
        ])
        
        mapView.delegate = self
        
        let center = CLLocationCoordinate2D(latitude: 35.68358493824179, longitude: 139.750327090532)
        mapView.region = MKCoordinateRegion(center: center, latitudinalMeters: 500, longitudinalMeters: 500)
        
        let longPress = UILongPressGestureRecognizer(target: self, action: #selector(didLongPress))
        longPress.minimumPressDuration = 0.5
        mapView.addGestureRecognizer(longPress)
    }
    
    @objc private func didLongPress(_ gesture: UILongPressGestureRecognizer) {
        guard gesture.state == .began else { return }
        
        let annotation = MKPointAnnotation()
        let location = gesture.location(in: mapView)
        let coordinate = mapView.convert(location, toCoordinateFrom: mapView)
        annotation.coordinate = coordinate
        annotation.title = "\(mapView.annotations.count)"
        mapView.addAnnotation(annotation)
    }
}

extension ViewController: MKMapViewDelegate {
    
    func mapView(_ mapView: MKMapView, viewFor annotation: MKAnnotation) -> MKAnnotationView? {
        
        let annotationView = mapView.dequeueReusableAnnotationView(withIdentifier: MKMapViewDefaultAnnotationViewReuseIdentifier, for: annotation) as! MKMarkerAnnotationView
        annotationView.displayPriority = .required
        annotationView.glyphImage = UIImage(systemName: "flame")! // SF Symbols の画像を使用
        annotationView.markerTintColor = selectTintColor(annotation) // 色の変更
        return annotationView
    }
    
    private func selectTintColor(_ annotation: MKAnnotation?) -> UIColor? {
        guard let annotation = annotation as? MKPointAnnotation else { return nil }
        let colors: [UIColor] = [.systemRed, .systemBlue, .systemYellow, .systemGreen]
        let index = Int(annotation.title ?? "") ?? 0
        let remainder = index % colors.count
        return colors[remainder]
    }
}

MKMarkerAnnotationView を継承したカスタムクラスを用意した場合のサンプルコード

カスタムクラス内で画像や色を設定すれば MKMapViewDelegate の実装は不要。

import UIKit
import MapKit

class ViewController: UIViewController {

    let mapView = MKMapView()
    
    override func viewDidLoad() {
        super.viewDidLoad()
        
        view.addSubview(mapView)
        mapView.translatesAutoresizingMaskIntoConstraints = false
        NSLayoutConstraint.activate([
            mapView.topAnchor.constraint(equalTo: view.safeAreaLayoutGuide.topAnchor),
            mapView.bottomAnchor.constraint(equalTo: view.safeAreaLayoutGuide.bottomAnchor),
            mapView.leftAnchor.constraint(equalTo: view.safeAreaLayoutGuide.leftAnchor),
            mapView.rightAnchor.constraint(equalTo: view.safeAreaLayoutGuide.rightAnchor),
        ])
        
        let center = CLLocationCoordinate2D(latitude: 35.68358493824179, longitude: 139.750327090532)
        mapView.region = MKCoordinateRegion(center: center, latitudinalMeters: 500, longitudinalMeters: 500)
        
        let longPress = UILongPressGestureRecognizer(target: self, action: #selector(didLongPress))
        longPress.minimumPressDuration = 0.5
        mapView.addGestureRecognizer(longPress)
        
        // カスタムアノテーションビューを登録
        mapView.register(CustomAnnotationView.self, forAnnotationViewWithReuseIdentifier: MKMapViewDefaultAnnotationViewReuseIdentifier)
    }
    
    @objc private func didLongPress(_ gesture: UILongPressGestureRecognizer) {
        guard gesture.state == .began else { return }
        
        let annotation = MKPointAnnotation()
        let location = gesture.location(in: mapView)
        let coordinate = mapView.convert(location, toCoordinateFrom: mapView)
        annotation.coordinate = coordinate
        annotation.title = "\(mapView.annotations.count)"
        mapView.addAnnotation(annotation)
    }
}

// カスタムアノテーションビューの定義
class CustomAnnotationView: MKMarkerAnnotationView {
    
    override var annotation: MKAnnotation? {
        didSet {
            configure(for: annotation)
        }
    }
    
    override init(annotation: MKAnnotation?, reuseIdentifier: String?) {
        super.init(annotation: annotation, reuseIdentifier: reuseIdentifier)

        glyphImage = UIImage(systemName: "flame")!
        
        configure(for: annotation)
    }

    required init?(coder aDecoder: NSCoder) {
        fatalError("init(coder:) has not been implemented")
    }

    func configure(for annotation: MKAnnotation?) {
        displayPriority = .required
        markerTintColor = selectTintColor(annotation)
    }
    
    private func selectTintColor(_ annotation: MKAnnotation?) -> UIColor? {
        guard let annotation = annotation as? MKPointAnnotation else { return nil }
        let colors: [UIColor] = [.systemRed, .systemBlue, .systemYellow, .systemGreen]
        let index = Int(annotation.title ?? "") ?? 0
        let remainder = index % colors.count
        return colors[remainder]
    }
}

マップ(MKMapView)上にピンを立てる

検証環境:
Xcode 12.4
Swift 5.3.2
iOS Deployment Target 14.4

マップ(MKMapView)を表示してピンを立てるだけの簡単な実装例。

マップビューにピンを追加するには、MKAnnotationプロトコルを適合したクラスを用意して、位置情報CLLocationCoordinate2Dを設定する。
そしてそのアノテーションをマップビューに追加すればよい。

以下サンプルでは、デフォルトで用意されているアノテーションクラスのMKPointAnnotationを使用し、マップ上で長押しした地点にピンを立てるようにした。

f:id:xyk:20210408120838p:plain

import UIKit
import MapKit

class ViewController: UIViewController {

    let mapView = MKMapView()
    
    override func viewDidLoad() {
        super.viewDidLoad()
        
        // マップビュー張り付け
        view.addSubview(mapView)
        mapView.translatesAutoresizingMaskIntoConstraints = false
        NSLayoutConstraint.activate([
            mapView.topAnchor.constraint(equalTo: view.safeAreaLayoutGuide.topAnchor),
            mapView.bottomAnchor.constraint(equalTo: view.safeAreaLayoutGuide.bottomAnchor),
            mapView.leftAnchor.constraint(equalTo: view.safeAreaLayoutGuide.leftAnchor),
            mapView.rightAnchor.constraint(equalTo: view.safeAreaLayoutGuide.rightAnchor),
        ])
        
        mapView.delegate = self
        
        // マップの中心緯度経度と表示範囲を指定
        let center = CLLocationCoordinate2D(latitude: 35.68358493824179, longitude: 139.750327090532)
        mapView.region = MKCoordinateRegion(center: center, latitudinalMeters: 500, longitudinalMeters: 500)
        
        // マップ上の長押しした地点にピンを立てるジェスチャーを追加
        let longPress = UILongPressGestureRecognizer(target: self, action: #selector(didLongPress))
        longPress.minimumPressDuration = 0.5
        mapView.addGestureRecognizer(longPress)
    }
    
    @objc private func didLongPress(_ gesture: UILongPressGestureRecognizer) {
        guard gesture.state == .began else { return }
        
        // MKPointAnnotation を生成してマップビューに追加する
        let annotation = MKPointAnnotation()
        let location = gesture.location(in: mapView)
        let coordinate = mapView.convert(location, toCoordinateFrom: mapView)
        annotation.coordinate = coordinate
        annotation.title = "\(mapView.annotations.count + 1)"
        mapView.addAnnotation(annotation)
    }
}

extension ViewController: MKMapViewDelegate {
    
    // ピンのビューである MKAnnotationView に変更を加えるためのデリゲートメソッド。変更する必要がなければこのデリゲートは省略してもよい。
    func mapView(_ mapView: MKMapView, viewFor annotation: MKAnnotation) -> MKAnnotationView? {

        let annotationView = mapView.dequeueReusableAnnotationView(withIdentifier: MKMapViewDefaultAnnotationViewReuseIdentifier, for: annotation)
        annotationView.displayPriority = .required // 縮小時にピンを省略せず表示させる
        return annotationView
    }
}

git で別ブランチから特定のファイルを取得する

検証環境:
git version 2.23.0

git で別ブランチから特定のファイルを取得する方法について。

ステージされている状態でファイルを取得する

$ git checkout <別ブランチ名> path/to/file

ステージされていない状態でファイルを取得する

$ git show <別ブランチ名>:path/to/file > path/to/file

git show で参照できるので、それをリダイレクトでファイル出力してる。

Swift - Struct のイニシャライザを Xcode で自動生成する

検証環境:
Xcode 12.4
Swift 5.3.2

Swift の Struct にはデフォルトで暗黙的なイニシャライザ init メソッドが定義されているので自分で実装する必要ないのだが、public structで定義して別モジュールから import して使う場合は使用できない。

以下の Initializers を参照。
Access Control — The Swift Programming Language (Swift 5.4)

なので初期化用の init メソッドを自分で実装しなければならないのだが、メンバ変数がたくさんあると面倒である。
調べたところ Xcode に自動生成する機能をあったのでそれを使えば楽に生成できた。

やり方

以下のような Struct を定義したとする。

f:id:xyk:20210325121207p:plain

Struct 名を右クリックし、Refactor -> Generate Memberwise Initializer を選択。

f:id:xyk:20210325121217p:plain

イニシャライザのコードが自動生成された。

f:id:xyk:20210325121227p:plain

Swift - UIBezierPath でクーポン風画像のパスを描く

検証環境:
Xcode 12.4
Swift 5.3.2

UIBezierPath のよるお絵描きシリーズ。
今回は UIBezierPath を使って、以下のようなクーポン用画像としてよく使われる図形をを描いてみる。

Playground コードサンプル

import UIKit
import PlaygroundSupport

class CouponFrameView: UIView {
    
    private let lineWidth: CGFloat = 8
    private let strokeColor = UIColor.systemYellow
    
    private lazy var borderLayer: CAShapeLayer = {
        let shapeLayer = CAShapeLayer()
        shapeLayer.lineWidth = lineWidth
        shapeLayer.strokeColor = strokeColor.cgColor
        shapeLayer.fillColor = UIColor.white.cgColor
        shapeLayer.lineJoin = .round // パスの接続部分を丸くする
        return shapeLayer
    }()

    override init(frame: CGRect) {
        super.init(frame: frame)
        configure()
    }
    
    required init?(coder: NSCoder) {
        fatalError("init(coder:) has not been implemented")
    }
    
    override func layoutSubviews() {
        super.layoutSubviews()
        
        borderLayer.path = makeCouoponPath(rect: bounds)
    }
    
    private func configure() {
        // layer.backgroundColor = UIColor.systemGray4.cgColor // 矩形確認用
        layer.addSublayer(borderLayer)
    }
    
    private func makeCouoponPath(rect: CGRect) -> CGPath {
        
        let half = lineWidth / 2
        let rect = rect.insetBy(dx: half, dy: half) // 矩形内に収まるように線幅の半分小さくする
        
        let cornerRadius: CGFloat = 32
        let hollowRadius: CGFloat = 16

        let path = UIBezierPath()
        path.move(to: CGPoint(x: rect.minX + cornerRadius, y: rect.minY)) // 1
        path.addLine(to: CGPoint(x: rect.maxX - cornerRadius, y: rect.minY)) // 2
        path.addArc(withCenter: CGPoint(x: rect.maxX - cornerRadius, y: rect.minY + cornerRadius), // 3
                    radius: cornerRadius,
                    startAngle: -radian(90),
                    endAngle: 0,
                    clockwise: true)
        path.addLine(to: CGPoint(x: rect.maxX, y: rect.midY - hollowRadius)) // 4
        path.addArc(withCenter: CGPoint(x: rect.maxX, y: rect.midY), // 5
                    radius: hollowRadius,
                    startAngle: -radian(90),
                    endAngle: radian(90),
                    clockwise: false)
        path.addLine(to: CGPoint(x: rect.maxX, y: rect.maxY - cornerRadius)) // 6
        path.addArc(withCenter: CGPoint(x: rect.maxX - cornerRadius, y: rect.maxY - cornerRadius), // 7
                    radius: cornerRadius,
                    startAngle: 0,
                    endAngle: radian(90),
                    clockwise: true)
        path.addLine(to: CGPoint(x: rect.minX + cornerRadius, y: rect.maxY)) // 8
        path.addArc(withCenter: CGPoint(x: rect.minX + cornerRadius, y: rect.maxY - cornerRadius), // 9
                    radius: cornerRadius,
                    startAngle: radian(90),
                    endAngle: radian(180),
                    clockwise: true)
        path.addLine(to: CGPoint(x: rect.minX, y: rect.midY + hollowRadius)) // 10
        path.addArc(withCenter: CGPoint(x: rect.minX, y: rect.midY), // 11
                    radius: hollowRadius,
                    startAngle: radian(90),
                    endAngle: -radian(90),
                    clockwise: false)
        path.addLine(to: CGPoint(x: rect.minX, y: rect.minY + cornerRadius)) // 12
        path.addArc(withCenter: CGPoint(x: rect.minX + cornerRadius, y: rect.minY + cornerRadius), // 13
                    radius: cornerRadius,
                    startAngle: radian(180),
                    endAngle: -radian(90),
                    clockwise: true)
        path.close()
        
        return path.cgPath
    }
    
    private func radian(_ degree: CGFloat) -> CGFloat {
        return degree * .pi / 180.0
    }
}

class MyViewController: UIViewController {
    
    override func viewDidLoad() {
        super.viewDidLoad()
        
        view.backgroundColor = .systemGray5
        
        let couponFrameView = CouponFrameView()
        view.addSubview(couponFrameView)
        couponFrameView.translatesAutoresizingMaskIntoConstraints = false
        NSLayoutConstraint.activate([
            couponFrameView.centerXAnchor.constraint(equalTo: view.centerXAnchor),
            couponFrameView.centerYAnchor.constraint(equalTo: view.centerYAnchor),
            couponFrameView.widthAnchor.constraint(equalToConstant: 500),
            couponFrameView.heightAnchor.constraint(equalToConstant: 200),
        ])
    }
}

PlaygroundPage.current.liveView = MyViewController()

パスの描画順序

その他の UIBezierPath シリーズ

xyk.hatenablog.com

xyk.hatenablog.com

UICollectionViewCell の Self-Sizing で動的にセルサイズを調整する

検証環境:
Xcode 12.4
Swift 5.3.2

UICollectionViewCell の Self-Sizing 機能でコンテンツに基づいて動的にセルサイズを調整する方法について。

まず今回 UICollectionView を使って実現したいレイアウトは横幅が画面幅(collectionView.frame.width)で、縦幅はセル内のコンテンツが可変であるためそれが収まるように動的に決まり、縦スクロールする UITableView のようなレイアウト。

セルサイズを自分で計算するのではなく、 Self-Sizing 機能を使って自動で調整されるようにしたい。

f:id:xyk:20210226130516p:plain

StoaryBoard 設定

  • StoryBoard で Root View に UICollectionView 及び UICollectionViewCell のビューを置く。
    UICollectionView と UICollectionViewDelegateFlowLayout は @IBOutlet でコード上の定義と接続する。

  • UICollectionViewCell の ContentView には Lines 0 の UILabel を置く。
    UILabel に ContentView の4辺と合わせる制約と、暫定の width の制約を付ける。
    そして UILabel と UILabel の width 制約は @IBOutlet でコード上の定義 maxWidthConstraint と接続する。

f:id:xyk:20210226131806p:plain

コードサンプル

セルフサイジングを有効にするにはUICollectionViewFlowLayout.estimatedItemSizeに 0 以外の値、通常はUICollectionViewFlowLayout.automaticSizeを設定する必要がある。
UICollectionViewFlowLayout.itemSizeUICollectionViewDelegateFlowLayout#collectionView(_:layout:sizeForItemAt:)デリゲートメソッドによるセルサイズ指定は不要。

import UIKit

final class ViewController: UIViewController {
    
    var items: [String] = []
    
    override func viewDidLoad() {
        super.viewDidLoad()
        
        for _ in 0..<10 {
            items.append(String(repeating: "あいうえおかきくけこ", count: .random(in: 1...10)))
        }
    }
    
    @IBOutlet weak var collectionView: UICollectionView! {
        didSet {
            collectionView.dataSource = self
            collectionView.delegate = self
            collectionView.alwaysBounceVertical = true
        }
    }
    
    @IBOutlet weak var flowLayout: UICollectionViewFlowLayout! {
        didSet {
            flowLayout.minimumLineSpacing = 8
            flowLayout.estimatedItemSize = UICollectionViewFlowLayout.automaticSize
            flowLayout.scrollDirection = .vertical
            flowLayout.sectionInset = .init(top: 8, left: 0, bottom: 8, right: 0)
        }
    }
}

extension ViewController: UICollectionViewDataSource {
    
    func collectionView(_ collectionView: UICollectionView, numberOfItemsInSection section: Int) -> Int {
        return items.count
    }
    
    func collectionView(_ collectionView: UICollectionView, cellForItemAt indexPath: IndexPath) -> UICollectionViewCell {
        let cell = collectionView.dequeueReusableCell(withReuseIdentifier: "CollectionViewCell", for: indexPath) as! CollectionViewCell
        cell.contentView.backgroundColor = (indexPath.item % 2 == 0) ? .systemGray4 : .systemGray6
        let item = items[indexPath.item]
        cell.titleLabel.text = item
        cell.maxWidth = collectionView.bounds.width - 16
        return cell
    }
}

extension ViewController: UICollectionViewDelegate {
    
}

class CollectionViewCell: UICollectionViewCell {
    
    @IBOutlet weak var titleLabel: UILabel!
    @IBOutlet weak var maxWidthConstraint: NSLayoutConstraint!
    
    var maxWidth: CGFloat? {
        didSet {
            guard let maxWidth = maxWidth else { return }
            maxWidthConstraint.constant = maxWidth
        }
    }
    
    override func awakeFromNib() {
        super.awakeFromNib()
        
        // iOS12のみ以下制約をつけないとAutoLayoutが効かない
        contentView.translatesAutoresizingMaskIntoConstraints = false
        NSLayoutConstraint.activate([
            contentView.leftAnchor.constraint(equalTo: leftAnchor),
            contentView.rightAnchor.constraint(equalTo: rightAnchor),
            contentView.topAnchor.constraint(equalTo: topAnchor),
            contentView.bottomAnchor.constraint(equalTo: bottomAnchor)
        ])
    }
}

UICollectionView で複数 Section の Header と Footer を表示する

検証環境:
Xcode 12.4
Swift 5.3.2

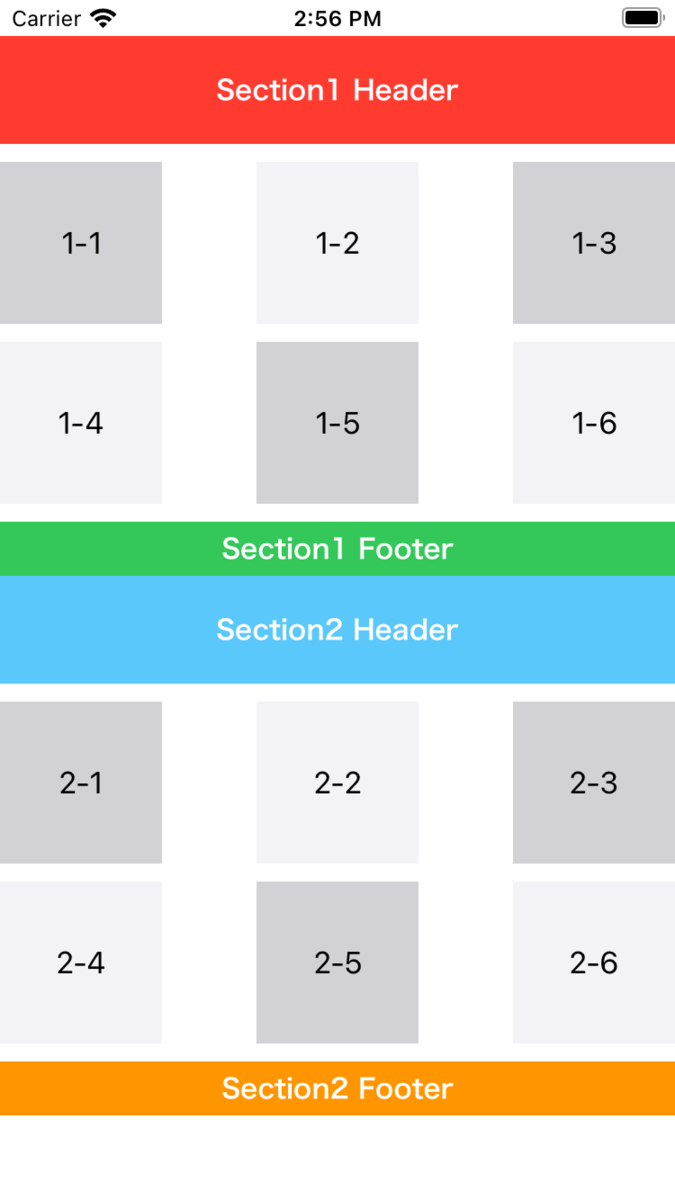
UICollectionView で複数セクションのヘッダーとフッターを表示する方法について。

f:id:xyk:20210226145730p:plain

StoaryBoard 設定

まず StoryBoard で Root View に UICollectionView 及び UICollectionViewCell のビューを設置しておく。
UICollectionView と UICollectionViewDelegateFlowLayout は @IBOutlet でコード上の定義と紐付ける。

f:id:xyk:20210226121457p:plain ヘッダービュー、フッタービュー(UICollectionReusableView)は StoryBoard 上で設置できるのは各1つのみで複数の設置はできない。(同じビューを使い回すのは可能)
なので複数のヘッダービュー、フッタービューを表示したい場合はコード側でやるしかない(と思われる)。
今回はNibファイル(.xib)で用意し、collectionView#register メソッドで登録する。
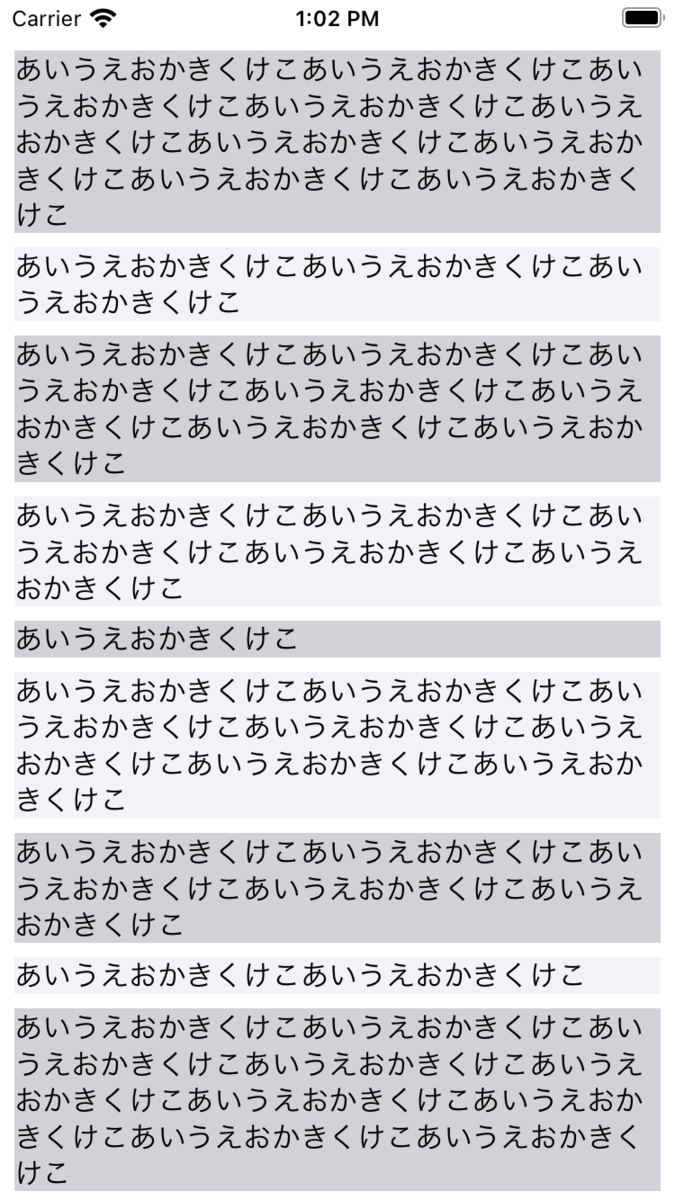
f:id:xyk:20210226114633p:plain

ヘッダー、フッターを表示する

ヘッダー、フッターを表示させるには、ビューのサイズを指定する必要がある。
1つは、UICollectionViewFlowLayout のheaderReferenceSizeまたはfooterReferenceSizeプロパティでサイズを指定する方法、もう1つは UICollectionViewDelegate のcollectionView(_:layout:referenceSizeForHeaderInSection:)またはcollectionView(_:layout:referenceSizeForFooterInSection:)のデリゲートメソッドでサイズを指定する方法のどちらか。
このサイズに 0 を設定するとヘッダー、フッターは表示されなくなる。

コード側で指定しなくても StoryBoard 側で UICollectionView にある以下のチェックを入れるとヘッダー、フッターが自動生成されるので、これでも表示させることができる。

f:id:xyk:20210226120006p:plain

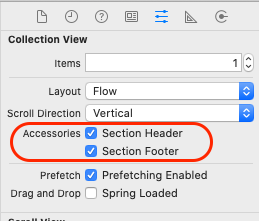
この場合は先にも書いたとおり追加できるのはヘッダー、フッター各1つのみ。
今回は複数のヘッダー、フッターを追加するのが目的なのでここは使わない。

サンプルコード

import UIKit

class ViewController: UIViewController {
    
    enum Section: Int, CaseIterable {
        case section1 = 0
        case section2
    }
    
    var items1: [String] = ["1-1", "1-2", "1-3", "1-4", "1-5", "1-6"]
    var items2: [String] = ["2-1", "2-2", "2-3", "2-4", "2-5", "2-6"]
    
    override func viewDidLoad() {
        super.viewDidLoad()
        
    }
    
    @IBOutlet weak var collectionView: UICollectionView! {
        didSet {
            collectionView.register(
                UINib(nibName: "Section1HeaderView", bundle: nil),
                forSupplementaryViewOfKind: UICollectionView.elementKindSectionHeader,
                withReuseIdentifier: "Section1HeaderView")
            collectionView.register(
                UINib(nibName: "Section1FooterView", bundle: nil),
                forSupplementaryViewOfKind: UICollectionView.elementKindSectionFooter,
                withReuseIdentifier: "Section1FooterView")
            collectionView.register(
                UINib(nibName: "Section2HeaderView", bundle: nil),
                forSupplementaryViewOfKind: UICollectionView.elementKindSectionHeader,
                withReuseIdentifier: "Section2HeaderView")
            collectionView.register(
                UINib(nibName: "Section2FooterView", bundle: nil),
                forSupplementaryViewOfKind: UICollectionView.elementKindSectionFooter,
                withReuseIdentifier: "Section2FooterView")
            
            collectionView.dataSource = self
            collectionView.delegate = self
            collectionView.alwaysBounceVertical = true
        }
    }
    
    @IBOutlet weak var flowLayout: UICollectionViewFlowLayout! {
        didSet {
            flowLayout.estimatedItemSize = .zero // Self-Sizing off
            flowLayout.scrollDirection = .vertical
            flowLayout.sectionHeadersPinToVisibleBounds = true
            flowLayout.sectionFootersPinToVisibleBounds = false
        }
    }
}

extension ViewController: UICollectionViewDataSource {
    
    func numberOfSections(in collectionView: UICollectionView) -> Int {
        return Section.allCases.count
    }
    
    func collectionView(_ collectionView: UICollectionView, numberOfItemsInSection section: Int) -> Int {
        switch Section(rawValue: section)! {
        case .section1:
            return items1.count
        case .section2:
            return items2.count
        }
    }

    func collectionView(_ collectionView: UICollectionView, cellForItemAt indexPath: IndexPath) -> UICollectionViewCell {
        let cell = collectionView.dequeueReusableCell(withReuseIdentifier: "CollectionViewCell", for: indexPath) as! CollectionViewCell
        cell.contentView.backgroundColor = (indexPath.item % 2 == 0) ? .systemGray4 : .systemGray6
        switch Section(rawValue: indexPath.section)! {
        case .section1:
            cell.titleLabel.text = items1[indexPath.item]
        case .section2:
            cell.titleLabel.text = items2[indexPath.item]
        }
        return cell
    }

    func collectionView(_ collectionView: UICollectionView, viewForSupplementaryElementOfKind kind: String, at indexPath: IndexPath) -> UICollectionReusableView {
        switch kind {
        case UICollectionView.elementKindSectionHeader:
            switch Section(rawValue: indexPath.section)! {
            case .section1:
                return collectionView.dequeueReusableSupplementaryView(
                    ofKind: kind, withReuseIdentifier: "Section1HeaderView", for: indexPath)
            case .section2:
                return collectionView.dequeueReusableSupplementaryView(
                    ofKind: kind, withReuseIdentifier: "Section2HeaderView", for: indexPath)
            }
        case UICollectionView.elementKindSectionFooter:
            switch Section(rawValue: indexPath.section)! {
            case .section1:
                return collectionView.dequeueReusableSupplementaryView(
                    ofKind: kind, withReuseIdentifier: "Section1FooterView", for: indexPath)
            case .section2:
                return collectionView.dequeueReusableSupplementaryView(
                    ofKind: kind, withReuseIdentifier: "Section2FooterView", for: indexPath)
            }
        default:
            fatalError()
        }
    }
}

extension ViewController: UICollectionViewDelegate {
    
}

extension ViewController: UICollectionViewDelegateFlowLayout {
    
    // セルのサイズ
    func collectionView(_ collectionView: UICollectionView, layout collectionViewLayout: UICollectionViewLayout, sizeForItemAt indexPath: IndexPath) -> CGSize {
        return CGSize(width: 90, height: 90)
    }
    
    func collectionView(_ collectionView: UICollectionView, layout collectionViewLayout: UICollectionViewLayout, insetForSectionAt section: Int) -> UIEdgeInsets {
        return UIEdgeInsets(top: 10, left: 0, bottom: 10, right: 0)
    }
    
    func collectionView(_ collectionView: UICollectionView, layout collectionViewLayout: UICollectionViewLayout, minimumLineSpacingForSectionAt section: Int) -> CGFloat {
        return 10
    }
    
    func collectionView(_ collectionView: UICollectionView, layout collectionViewLayout: UICollectionViewLayout, minimumInteritemSpacingForSectionAt section: Int) -> CGFloat {
        return 10
    }
    
    // ヘッダーのサイズ
    func collectionView(_ collectionView: UICollectionView, layout collectionViewLayout: UICollectionViewLayout, referenceSizeForHeaderInSection section: Int) -> CGSize {
        switch Section(rawValue: section)! {
        case .section1:
            return CGSize(width: collectionView.frame.width, height: 60)
        case .section2:
            return CGSize(width: collectionView.frame.width, height: 60)
        }
    }
    
    // フッターのサイズ
    func collectionView(_ collectionView: UICollectionView, layout collectionViewLayout: UICollectionViewLayout, referenceSizeForFooterInSection section: Int) -> CGSize {
        switch Section(rawValue: section)! {
        case .section1:
            return CGSize(width: collectionView.frame.width, height: 30)
        case .section2:
            return CGSize(width: collectionView.frame.width, height: 30)
        }
    }
}

class CollectionViewCell: UICollectionViewCell {
    @IBOutlet weak var titleLabel: UILabel!
}

class Section1HeaderView: UICollectionReusableView {
    
}

class Section1FooterView: UICollectionReusableView {
    
}

class Section2HeaderView: UICollectionReusableView {
    
}

class Section2FooterView: UICollectionReusableView {
    
}

メニューバーに常駐する masOS アプリを作る

検証環境:
Xcode 12.4
Swift 5.3.2

メニューバーに常駐する簡単な masOS アプリを作ってみる。

f:id:xyk:20210223123827p:plain

  • まず Xcode のプロジェクト作成から macOS -> App テンプレートを選択する。
    AppDelegate.swift ファイルに以下コードを書く。
    NSMenu と NSMenuItem でメニューを作成、それを NSStatusItem にセットする。
import Cocoa

@main
class AppDelegate: NSObject, NSApplicationDelegate {
    
    // NSStatusItem.variableLength でメニューバーの横幅が可変となる。 variableLength: -1.0, squareLength: -2.0
    let statusItem = NSStatusBar.system.statusItem(withLength: NSStatusItem.variableLength)
    
    func applicationDidFinishLaunching(_ aNotification: Notification) {
        let menu = NSMenu()
        menu.addItem(NSMenuItem(title: "menu1", action: #selector(menu1), keyEquivalent: ""))
        menu.addItem(NSMenuItem(title: "menu2", action: #selector(menu2), keyEquivalent: ""))
        menu.addItem(NSMenuItem.separator())
        menu.addItem(NSMenuItem(title: "quit", action: #selector(quit), keyEquivalent: "q"))
        statusItem.menu = menu
        
        statusItem.button?.title = "Sample"
    }
    
    @objc func menu1(_ sender: NSMenuItem) {
        print("click menu1")
    }
    
    @objc func menu2(_ sender: NSMenuItem) {
        print("click menu2")
    }
    
    @objc func quit(_ sender: NSMenuItem) {
        print("quit")
        NSApplication.shared.terminate(self)
    }
}
  • Main.storyboard を開き、WindowController を選択し、Is Initial Controllerのチェックを外しておく。
    これで空のウインドウが表示されなくなる。

  • info.plist を開き、プラスボタンで1行追加する。そして
    Key にApplication is agent (UIElement)を選択し、ValueYESとする。
    Source Code として開くと以下の xml が追加されている。

<key>LSUIElement</key>
<true/>

これで Dock 内にこのアプリケーションが表示されなくなる。

macOS でのカーソル移動の高速化

macOS でのカーソル移動の高速化をシステム環境設定からではなくdefaultsコマンドで変更する方法について。

f:id:xyk:20210223113805p:plain

システム環境設定からキーのリピートリピート入力認識までの時間ともに最速に設定しているが、defaultsコマンドを使うことでさらに高速化できる。

変更前に現在の設定値を確認する。

$ defaults read -g KeyRepeat
2
$ defaults read -g InitialKeyRepeat
15

最速に変更する。

$ defaults write -g KeyRepeat -int 1
$ defaults write -g InitialKeyRepeat -int 10